Submitting Team Entries for a Cross Country Meet
Overview
One of the biggest time-savers AthleticNET provides for coaches is the ability to quickly and easily submit meet entries to meet hosts. AthleticNET allows you to enter participants into meets with just a few clicks. In this article, we'll show you how to submit entries for an upcoming meet.
If the meet host has set a deadline for meet entries, it will be listed at the top of the main entries page, as well as on your team's calendar. Meet entries may be freely changed until this deadline. After this deadline, registrations will lock. You'll need to contact the meet host to make any changes after the registration deadline.
Accessing the Meet Registration Page
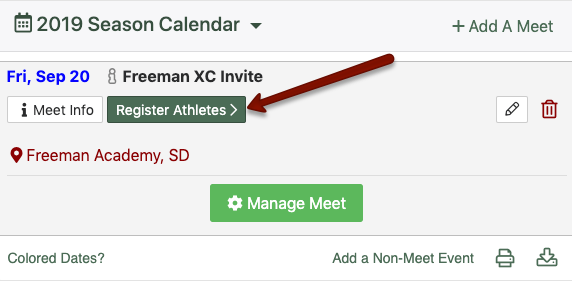
From your team's homepage, scroll down to the calendar and click on the meet name you're registering for. This will expand the calendar entry to show details about the event, including the location, time, and entry deadline, if one has been set. From here, click on Register Athletes .

Entering Athletes
Entering athletes is simple once you've accessed the Register Athletes screen. Simply use the dropdown box next to each athlete's name to select in which race division the athlete will compete. However, there are number of options that will make it much easier to register large teams or split your team into multiple race divisions.
The “All Races” Screen
When you first click on the Register Athletes button from your team's calendar, you'll be presented with the All Races screen, where athletes can be entered into any race division. Here's an overview of the options you have from this screen:
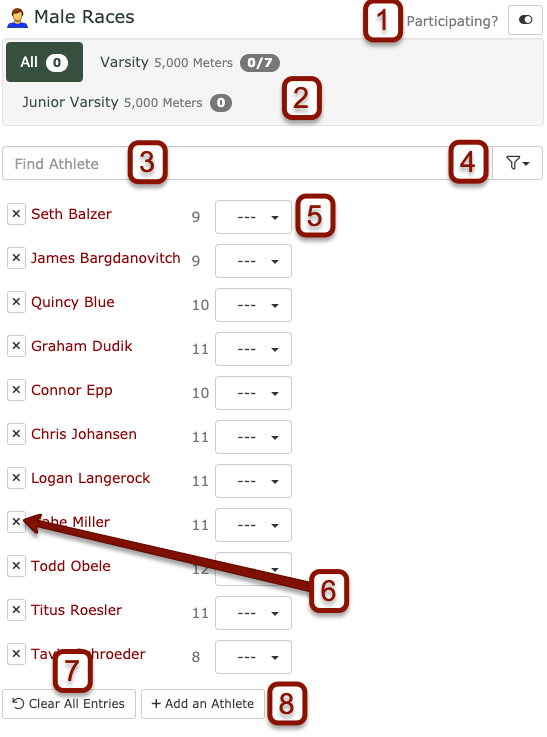
- Team Participation Switch: Toggle this switch to mark the male or female teams as “participating” or “not participating” in a meet (both male and female teams are marked as “participating” by default. If you indicate that a gender is not participating in a particular meet, the calendar on your team's homepage will be updated to reflect which gender is participating in the meet.
- Select a Race: Click on a race division to view entries for just that race division. Selecting a race division changes the visible options to allow quicker and easier registration of athletes. See The “Single Race” Screen, below. The numbers next to each race division name indicate how many athletes have been entered in that division. In this example, the meet host has elected to allow no more than seven athletes into the Varsity race division, but the Junior Varsity race division has an unlimited number of allowable entries.
- Find Athlete: Enter an athlete's full or partial name to narrow the list down.
- Filter Athletes: Opens a menu to allow you to filter the list of athletes by grade, age, or registration status.
- Enter an Athlete: Use the drop-down menu next to an athlete's name to select which race division they will be participating in. Selecting the race division registers the athlete in that division. The number next to the athlete's name indicates their grade or age, depending on how the meet host has elected to accept entries.

- Set Athlete as Ineligible: To set an athlete as ineligible, click the next to the athlete's name. This will mark the athlete as ineligible for this meet and all future meets. This is useful to indicate that an athlete may not compete when multiple coaches are helping each other complete the registration process. The athlete will be marked as ineligible for all future meets until the button next to the athlete's name is clicked again.
- Clear All Entries: Click this button to reset your entries and start over.
- Add an Athlete: Use this button to bring up a dialog box to quickly add an athlete to your roster.
The “Single Race” Screen
If you select a particular race using Select a Race above, you'll be shown this screen. Selecting a race makes it much quicker and easier to assign large numbers of athletes to a single race division with fewer clicks.
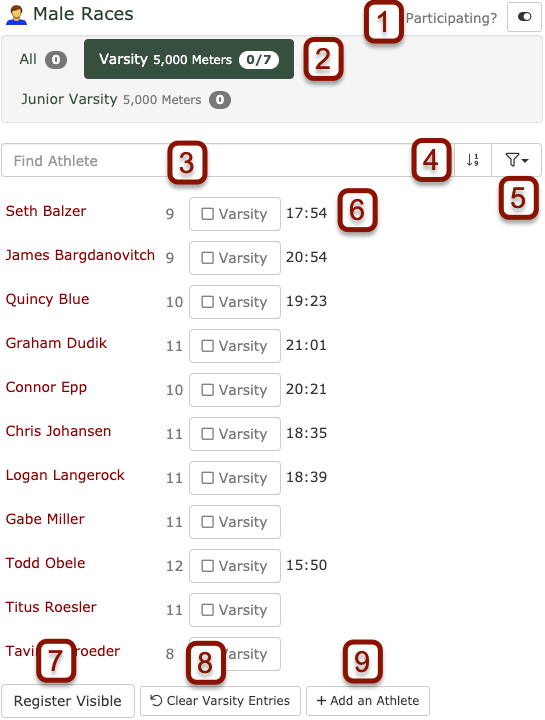
- Team Participation Switch: Toggle this switch to mark the male or female teams as “participating” or “not participating” in a meet (both male and female teams are marked as “participating” by default. If you indicate that a gender is not participating in a particular meet, the calendar on your team's homepage will be updated to reflect which gender is participating in the meet.
- Select a Race: Click on a race division to view entries for just that race division. Selecting a race division changes the visible options to allow quicker and easier registration of athletes. The numbers next to each race division name indicate how many athletes have been entered in that division. In this example, the meet host has elected to allow no more than seven athletes into the Varsity race division, but the Junior Varsity race division has an unlimited number of allowable entries.
- Find Athlete: Enter an athlete's full or partial name to narrow the list down.
- (Sort by Fastest Times): Re-orders the list of athletes so that fastest times at the current race distance are shown first. Times are taken from the athletes' season records at this distance. This allows coaches to see at a glance which athletes should be entered in a “Varsity” or “Elite” race division.
- Filter Athletes: Opens a menu to allow you to filter the list of athletes by grade, age, or registration status.
- Enter an Athlete: Enter the athlete in a race by clicking the name of the race division next to the athlete's name. Also displayed are the athlete's grade and season record at this distance (if one exists).
- Register Visible: Click to register all athletes currently displayed on the list into the selected race division. Use the Filter Athletes option to make best use of this feature.
- Clear [Race Division] Entries: Click this button to de-register all athletes in the current race division and start over.
- Add an Athlete: Use this button to bring up a dialog box to quickly add an athlete to your roster.
View a Report
When you've finished entering athletes, you can double-check your work by viewing a report of your entries as they will be submitted to the meet host. At the top of the page, under the meet name, click Finalized Entries. This will display a report of all athletes currently entered into races in a printer-friendly format.