Using OBS to Stream to a Castr Server for Automatic Chopping / Manual Upload
1. Introduction
What is OBS?
Open Broadcaster Software (OBS) is a free, open-source software used for video recording and live streaming. OBS allows users to stream content to various platforms like Twitch, YouTube, and custom servers like Castr. It supports multiple video sources, scenes, and powerful customization options, making it one of the most popular tools for content creators.
How does this work with AthleticLive?
Within AthleticLive, Timers have the ability to upload race videos to the Live Results webpage. This integration enhances the efficiency of race event coverage, allowing for smoother broadcasting and real-time updates. By combining OBS, AthleticSB and AthleticLive, the video upload process becomes highly automated and much more professionally streamlined, letting the Filmer focus on what matters most: capturing high-quality race footage.
2. Setting Up Your Equipment
How to Connect Your Video Sources
To stream with OBS, you need to connect your video sources such as cameras or capture cards. Follow these steps:
- Connecting a Camera:
- Plug your camera into your computer using a USB or onboard HDMI Capture card. (HDMI Output is not the same as a Capture Card, most laptops will not allow an HDMI signal input straight into the native HDMI slot!)
- If using an HDMI camera, you will need a capture card (e.g., Elgato Cam Link) to convert the HDMI signal to a USB input.
- If using a Phone camera, you will need a USB-C to HDMI adapter and also need a capture card to convert HDMI signal to USB input. (Not all Phones allow USB-C to video HDMI output, please check your phone/tablet specs!)
- Connecting a Capture Card:
- Plug your capture card into your computer’s USB or PCIe slot.
- Connect your camera’s HDMI output to the input of the capture card.
- Other Sources:
- You can also capture content directly from your screen or use other software sources for video input, like windows, browsers, or applications. (AthleticSB!)
- Integrate Images (Logos and Overlays) onto your Live Feed.
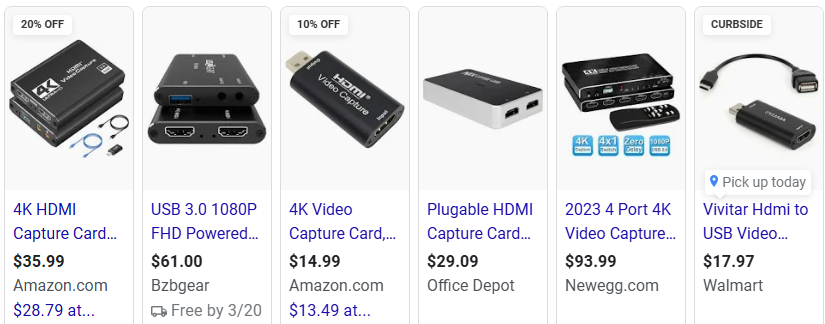
Recommended Hardware and Cables and Softwares
For optimal streaming performance, consider using the following:
- Camera/Video Sources Options:
- Modern SmartPhone/Tablet Camera: Typically need a USB-C Adapter and make sure the device is HDMI output enabled. Check your manual/phone specs for USB-C DisplayPort Alternate Mode or MHL. Source Type: Video Capture Device
Phones
- Samsung Galaxy Series
- Google Pixel Series
- OnePlus Devices
- LG Phones
Tablets:
- Lenovo Tab P11, P12 Pro
- Apple iPad Series
- Pro/Air/Mini 6th Gen
- Galaxy Tab Series S6, S7, S8, S9
- Lenovo Tab P11, P12 Pro
- PoE PTZ Camera: These are your typical outdoor security cameras. Most are PoE (Ethernet) based and require the software related to the brand. However, allows you to Pan, Tilt, and Zoom. Source type: Window Capture or Media Source
- Cinema Video Cameras: High quality cinema or sports cameras. These have SDI outputs usually require an SDI to HDMI adapter before inputting into the capture device. Source Type: Video Capture Device or Media Source
- Camcorders: Medium quality cameras. Very usable at 1080p, with moderate zoom. Most camcorders have MicroHDMI/MiniHDMI outputs ports. Source Type: Video Capture Device or Media Source
- DSLR and Mirrorless Cameras: Handheld cameras, usually used for photography but can be used as a streaming camera as well with the right connections. MicroHDMI/MiniHDMI connections usually. Source Type: Video Capture Device or Media Source
- Screen Mirror Applications: Some programs allow screen mirroring from your handheld device to your PC. This will allow you to screen capture the window via IP address, or wirelessly. Source Type: Window Capture
- AthleticSB Overlays: AthleticSB Overlays can be used as a source. Once you have your scoreboards built and open, add them to your scene with Source Type: Window Capture
- Computer: For a single camera, Recommend an i7 + an dedicated NVIDIA GPU + 16GB of RAM. A modern, low spec gaming laptop should be more than enough in most cases.
- Capture Card: Capture cards will vary based on quality. Some situations a simple USB-C to HDMI adapter will work, but sometimes length or power becomes an issue. Would recommend
- Cables/Auxiliary Equipment:
- HDMI/Mini/Micro HDMI cables(for cameras and capture cards),
- USB cables (for webcams and handheld devices),
- Ethernet cable (for a stable internet connection, or NDI feeds)
- SDI Cables: (for cameras that have SDI outputs)
- SDI to HDMI Converters: (for cameras that have SDI outputs for your Capture Card)
- Routers: Necessary with multiple NDI feeds.
- Mobile Hotspot or Hard-lined internet source: StarLinks or Verizon Hotspots have worked well.
Troubleshooting Common Connection Issues
- No Signal from Camera: Ensure the camera is turned on and connected securely to the capture card or USB port. (Try a different computer or cable, restart OBS)
- Video Lag or Quality Issues: Ensure your computer has the necessary processing power. Lower the resolution or bitrate settings if needed. (Turn off Video Preview.)
- Device Not Recognized: Check if the drivers for your webcam or capture card are installed correctly. Power cycle camera.
3. Configuring OBS for Video Capture
Installing and Launching OBS
- Download OBS: Visit https://obsproject.com/ and download the version compatible with your operating system (Windows/macOS/Linux).
- Install OBS: Follow the installation prompts to install OBS on your system.
- Launch OBS: Open OBS once the installation is complete.
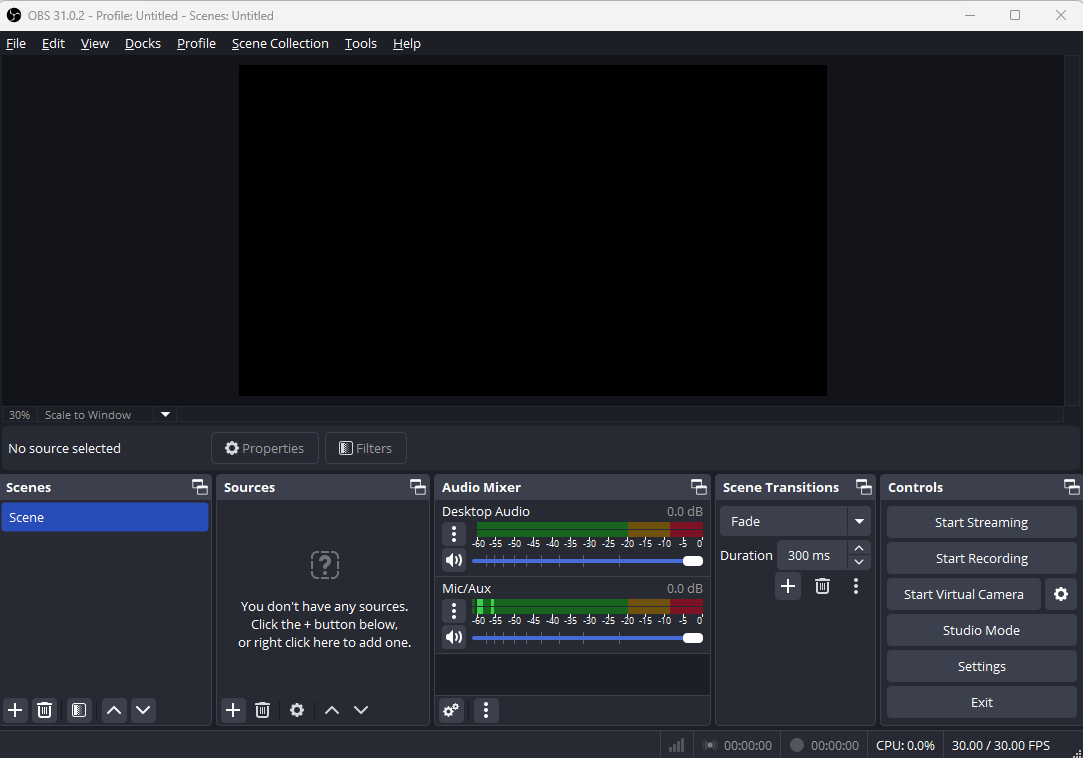
Creating a New Scene in OBS
- In OBS, click the "+" button under the Scenes box to create a new scene.
- Name the scene (e.g., “Live Track”, "Compiled Results", "Field Videos" etc) and click OK.
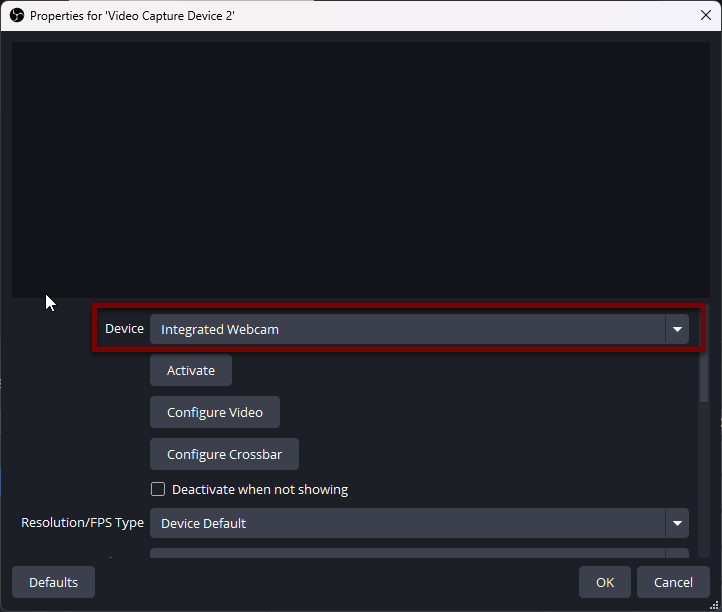
Adding Video Sources to the Scene
- Click the "+" button under the Sources box and choose the type of source:
- Video Capture Device: For cameras with capture cards - (HDMI to USB devices)
- Media Source: To capture a specific video source (Local File), or a video feed on the network (IP based devices)
- Window Capture: To capture a specific software window, (used for Overlays and static pictures/logos)
- Select your video source (camera or capture card) and adjust the settings (resolution, frame rate, etc.).
Setting Optimal Video Quality
- Resolution: Set the resolution based on your hardware capabilities. Common choices are 1920x1080 (Full HD) or 1280x720 (HD).
- Bitrate: In OBS, go to Settings > Output and set the bitrate to 2500-6000 kbps for optimal video quality (depending on your internet connection speed).
- FPS: A frame rate of 30-60 FPS is typically recommended for smooth video.
- Transform: Right-click and transform outputs to adjust sizing/viewing window/positioning/spacing.
4. Integrating ASB with OBS
- Set up ASB: First, ensure you have an ASB account and your event data is ready. You can visit support.athletic.net for instructions on setting up your scoreboard and event feed.
- Create your Boards: Typically a Live Track Board, a Compiled Results Board, and some Field Event Boards are what you will cycle through during your events. It helps to take these boards and create custom Scenes in the Broadcast panels, to easily cycle through your scoreboard types during production.
- Connect ASB to OBS: You will need to integrate the ASB feed into OBS. Typically, ASB provides you with either URL browser window (so you can open in a browser) or opens a Scoreboard window that can be added directly to OBS via Window Capture.
- Browser Integration: ASB offers a web-based scoreboard, you can use a Browser Source in OBS.
- In OBS, click the "+" button under Sources and select Browser.
- Paste the ASB URL into the URL field and adjust the width and height to match your scene requirements.
- Scoreboard Window: ASB can also create it's own windows that house each scoreboard, you can add them using the Window Capture option in OBS.
- Broadcast Panel Output: Another Layer of ASB that houses multiple Scoreboard windows in one Scene. Similiar to OBS Scenes. Powerful if used with OBS's Scenes to maximize layout options.
- Browser Integration: ASB offers a web-based scoreboard, you can use a Browser Source in OBS.
Designing and Customizing Overlays in ASB
- Create Your Custom Overlay: Through the ASB platform, you can customize the look and feel of your scoreboard and event data.
- Adjust colors, fonts, and positions of different elements (scores, timer, team names, etc.) to match your stream’s theme.
- Update Event Data: As the event progresses, ASB automatically updates the scoreboard data, which will reflect in OBS if you’re using a live feed. This real-time functionality helps keep your viewers engaged without manual updates. You will still need to click between the scenes accordingly, such as putting Live Track boards up during Track events, putting compiled up after the conclusion of each event, and putting Field Events up during downtime/during Field Event highlights.
5. Streaming to ALive Auto-Chop Server
Time Sync
Before booting cameras, please go to time.is and ensure your computer clock is the same. If not, do the following:
- Open Settings.
- Select Time and Language.
- Click Date and Time.
- Under the “Synchronize your clock” option, select the button that says “Sync Now”.
For a multi-day meet, please do this every morning before booting cameras to ensure no clock drift.
FinishLynx Setup
- Requires FinishLynx 13.00 or higher.
- Please update to the latest version of alive-results.lss as shown on the Downloads page. It should say version 2.1.0 on line 3.
- The main FinishLynx capture computer must follow the schedule of the meet. If you need to review a previous event, open it on another computer.
Obtain the Streaming URL and Key from AthleticLive
- Email live@athletic.net for access to this functionality. We will send you a dedicated stream ID.
- Edit your meet at admin.athletic.live and add the Stream ID to the "Scoreboard #1 Castr Stream ID". Choose your chopping methodology. Save the meet
- Enter Your Streaming URL and Key into OBS:
- Navigate to the Streaming Settings page.
- Set Service: Castr.io
- Set Server: Should Automatically Choose for you.
- Set Stream Key: From the admin meet detail page, click "Castr Streams" to get your stream key (should start with "live_".
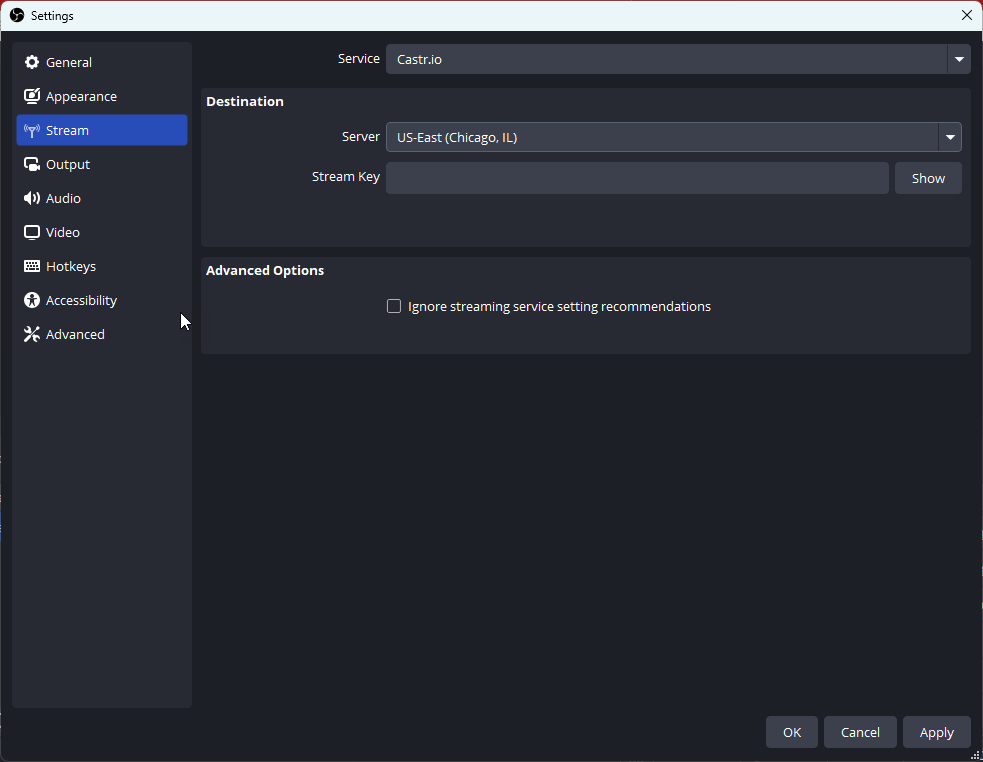
- Ensure the stream is working by going to the "Castr Streams" page and viewing the stream.
Setting Output Settings in OBS for Streaming
- Go to Settings > Output and set the Output Mode to Advanced.
- Under the Streaming tab, adjust the following settings:
- Encoder: Choose x264 for software encoding (slow), or NVENC (if available) for hardware encoding (faster).
- Bitrate: Set between 2500-6000 kbps based on your upload speed.
- Audio Bitrate: Set to 160 kbps for clear sound.
- Click OK to save the settings.
Testing the Stream Before Going Live
- Click Start Streaming in OBS.
- Check audio and video synchronization, and test the stream to make sure everything is working as expected before going live.
6. Manual Save and Upload
Setting up
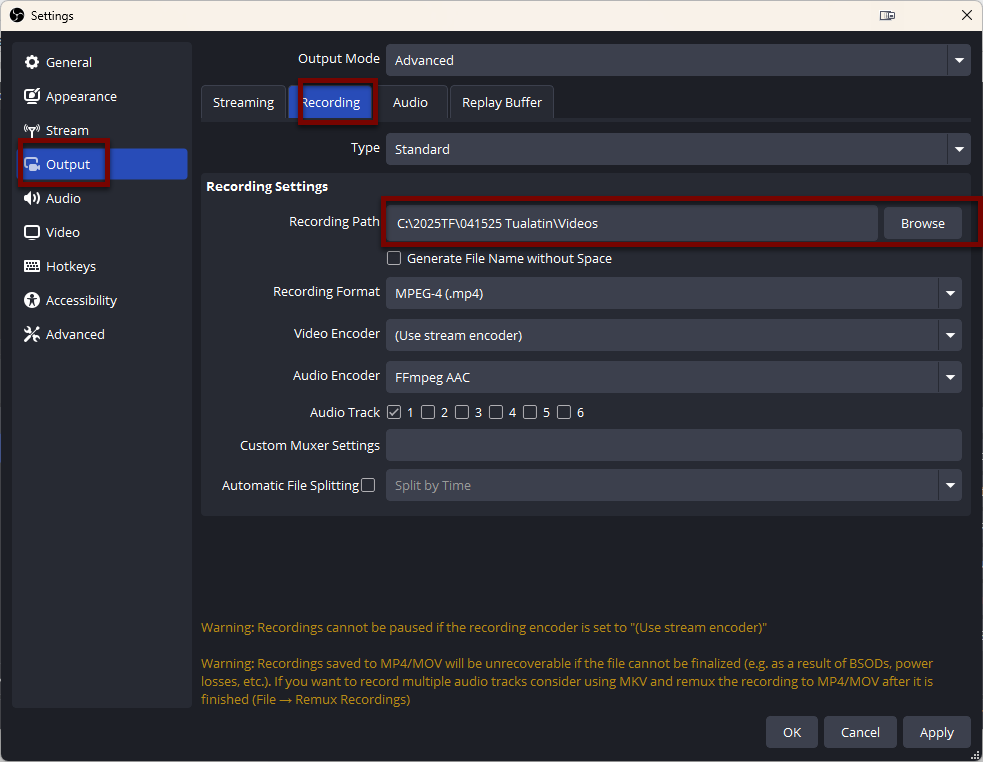
- Set your File Save Directory: In Settings, Output, and Recording. This will be where your video files are saved with the use of the Start Recording and Stop Recording buttons.
Using Field.tf
- Using your browser, go to the address field.tf
- This should look very similar to the AthleticFIELD App, remember that you will need to go through the settings each time to enable race videos.
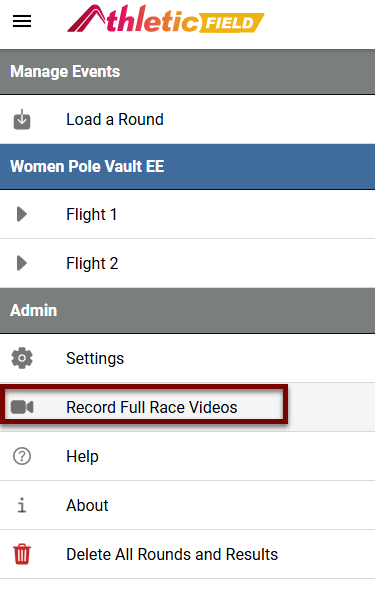
- After enabling Race Videos in the settings, you should be able to use the Record Full Race Videos button.

Utilize this, and OBS's video saving toolkit, you should be able to upload each video as you go.
7. Final Tips and Best Practices
Optimizing Streaming Performance
- Internet Speed: A wired Ethernet connection is recommended. Aim for at least 5 Mbps upload speed for stable streaming.
- Encoding Settings: Use hardware encoding (if available) to reduce CPU load and maintain stream stability.
- Resolution: Stream at 720p for lower bandwidth usage, or 1080p for better quality, depending on your internet speed.
Common Pitfalls to Avoid
- Overloading System Resources: Close unnecessary applications while streaming to avoid lag.
- Too High Bitrate: Don’t set your bitrate too high for your internet speed, as this can cause buffering and stream interruptions. Lag spikes and choppiness.
- Unstable Internet Connection: Always test your connection before streaming. Consider an isolated internet source or hard-lined internet from the pressbox.
7. FAQs
Q1: How do I fix my OBS stream if it’s dropping frames?
- A1: Check your bitrate and encoding settings. Lower the bitrate if necessary, or switch to hardware encoding (NVENC). Turn off video preview.
Q2: Can I stream using multiple cameras using OBS?
- A2: Yes, OBS allows as many Video Inputs as your computer can handle! Picture-In-Picture or split screen makes for great video footage!
Q3: How do I add custom transitions between scenes?
- A3: Go to Scene Transitions in OBS and add your preferred transition effects (fade, swipe, etc.). You can use scene transitions in ASB Broadcast panel if you are just changing overlay scenes, without making changes in OBS.
Q4: How do I know if my stream is working?
- A4: Check your admin.athletic.live page for the Castr Stream button.
