HyTek FTP Uploads
- FTP Settings
- Uploading an Event Schedule
- Upload Event Entries
- Upload a Team File
- Upload Rosters
- Upload Final Results
- Upload Heat by Heat Results
- Division by Team Meets
- Common Upload Problems
- Make sure you are on Passive FTP
- Make Sure F10, F11, and F12 are enabled
- Make sure HyTek is allowed to upload files
- TMobile does not allow FTP
- School and Facility Internet rarely allows FTP
- HyTek is stuck on "Sending Event Result to the Web..."
- FTP Upload problem
- Cannot upload. The User Name or Password may be invalid
- Cannot upload. The Working Directory path does not exist.
- Connection Refused or Timeout
FTP Settings
This article explains how to upload results from HyTek's Meet Manager to AthleticLIVE.
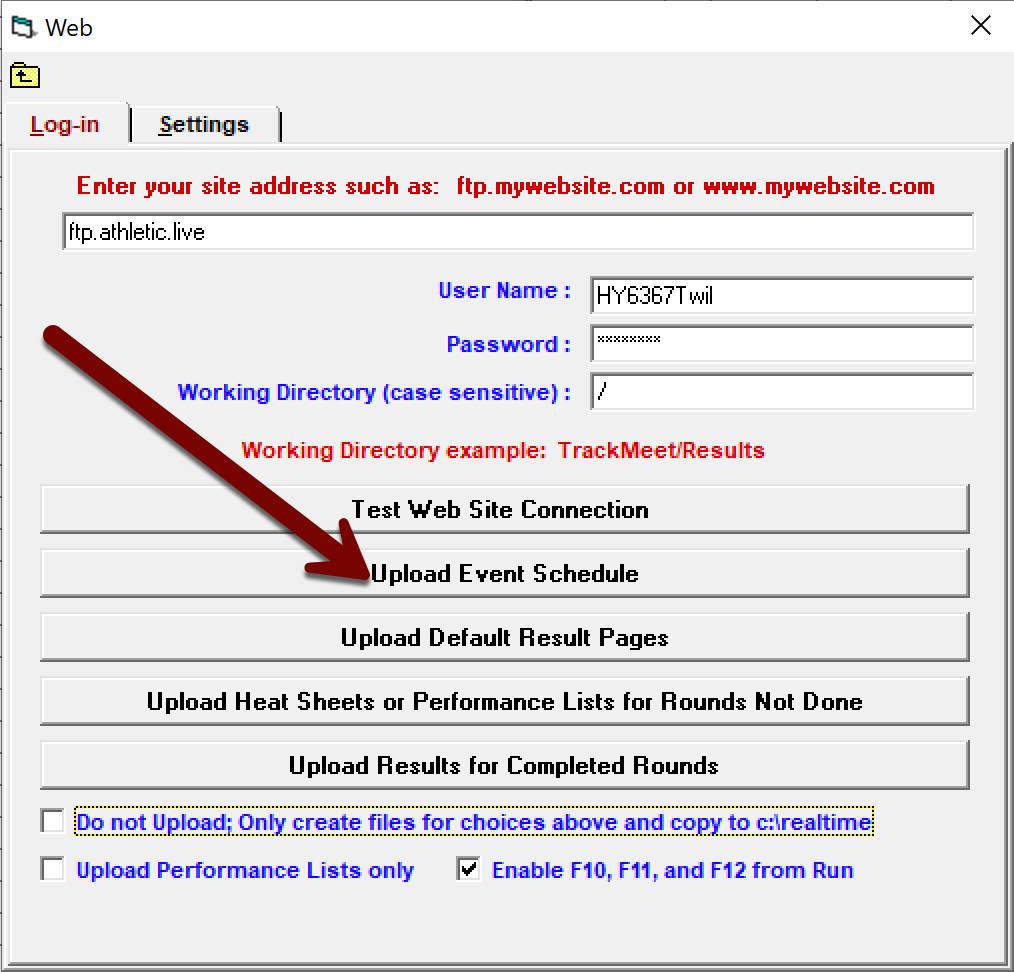
Step 1: Enter Credentials
Open HyTek's Meet Manager, and then open the Run screen from the menu bar.

Once you're on the Run the Meet screen, choose Web from the menu bar.

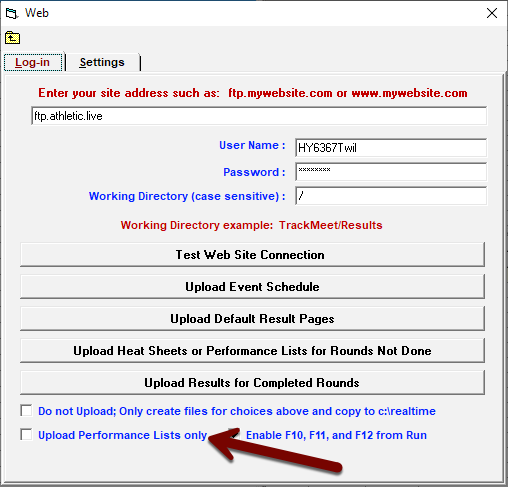
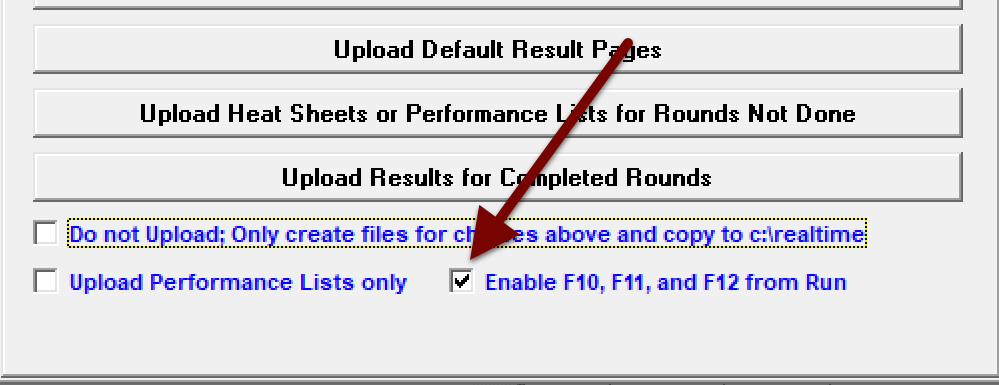
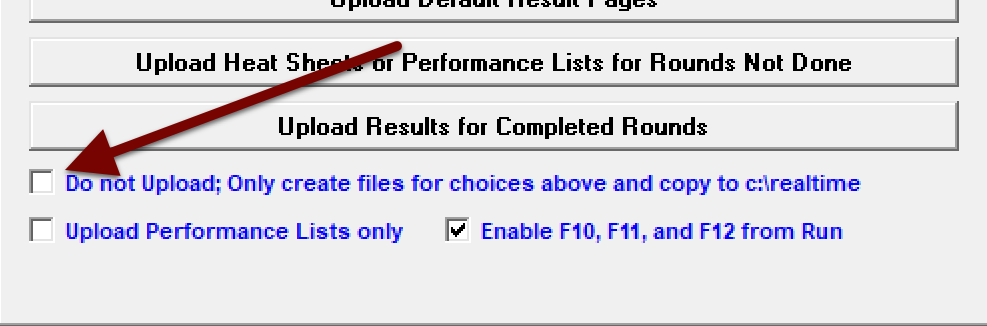
Choose the Log-in tab, and then copy the FTP upload credentials from your Meet Details into the dialog box. Ensure that Do not Upload... is unchecked. Ensure that Enable F10, F11, and F12 from Run is checked. If your meet director prefers to publish performance lists, rather than heat sheets, check the Upload Performance Lists only box.
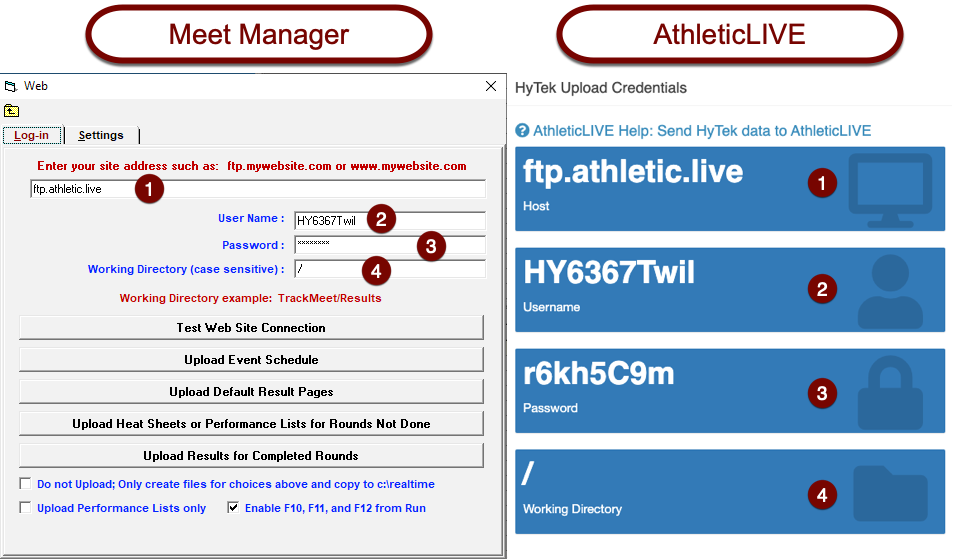
Once all credentials have been entered, click Test Web Site Connection to ensure the connection is working properly. If the connection is functioning, you'll get a successful connection message.
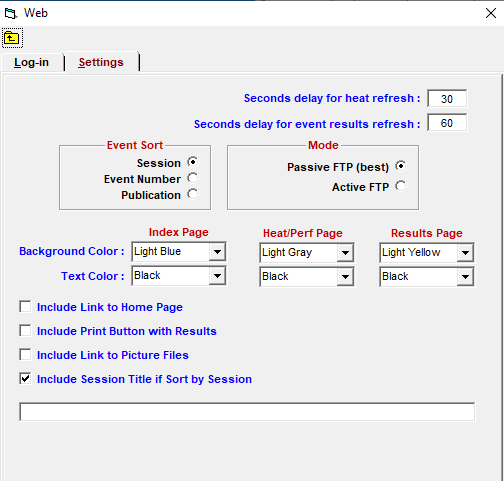
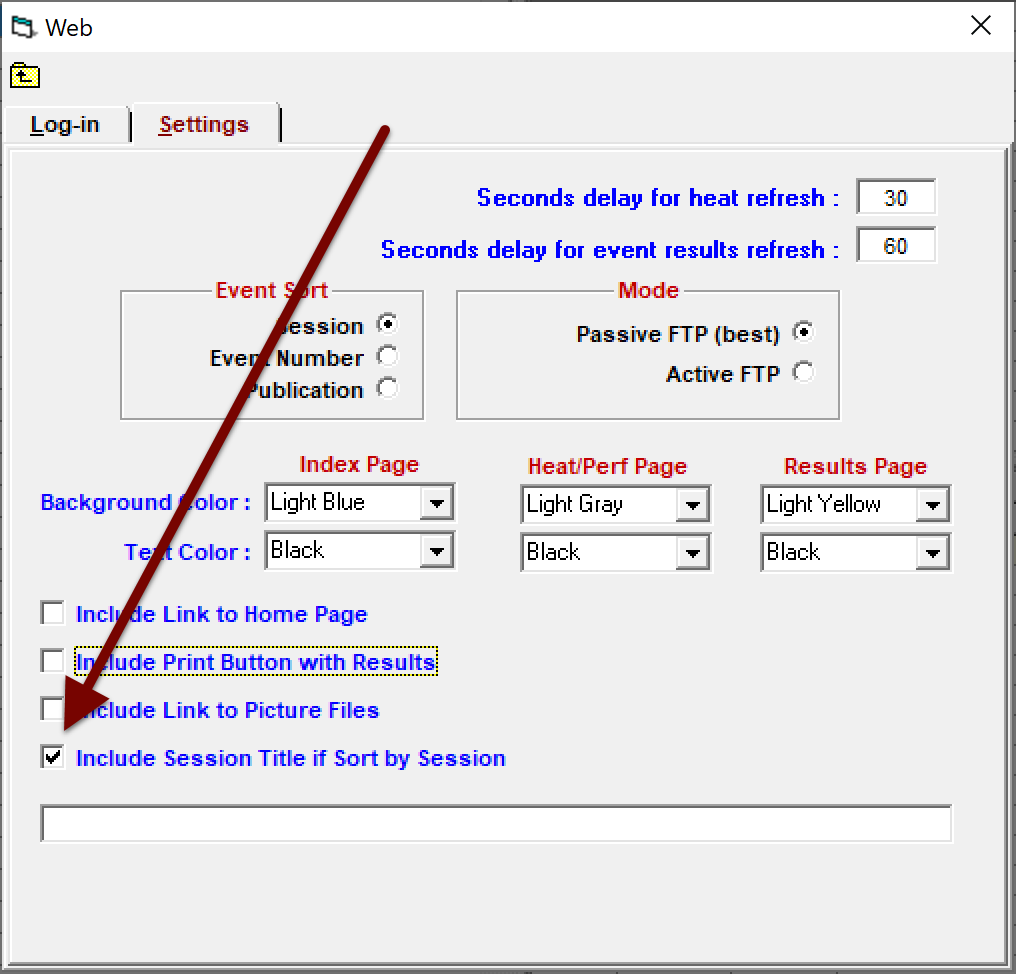
Step 2: Configure Settings
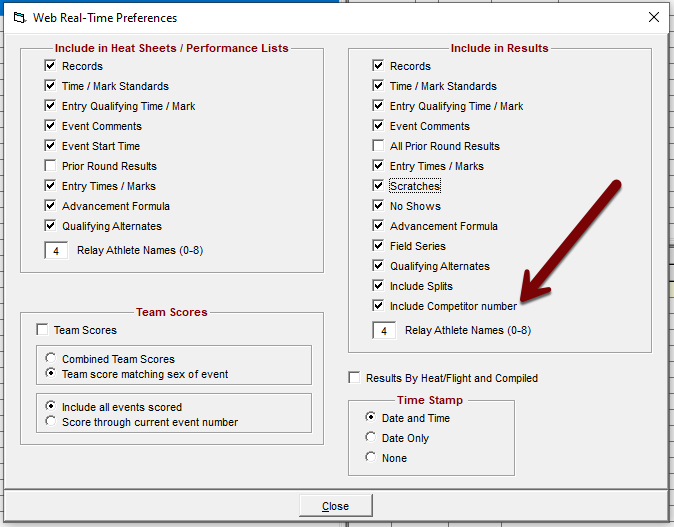
Navigate to the Settings tab, and ensure your settings match the screen below. You can ignore the color settings.
Step 3: Preferences
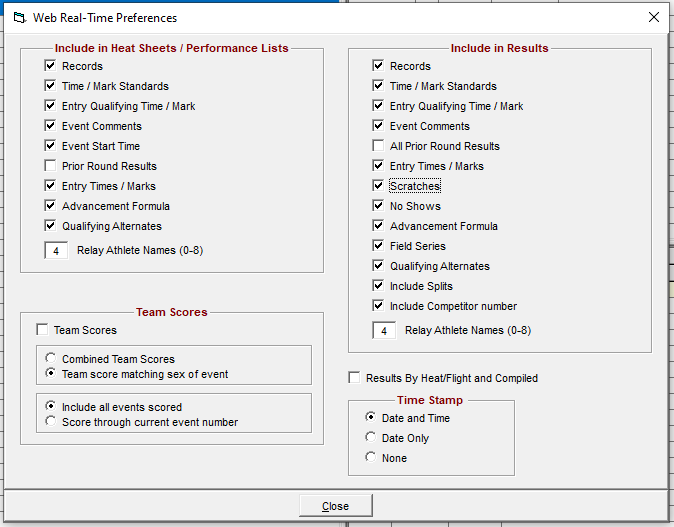
We need to ensure that Meet Manager includes all the data AthleticLIVE needs in the reports uploaded to AthleticLIVE.
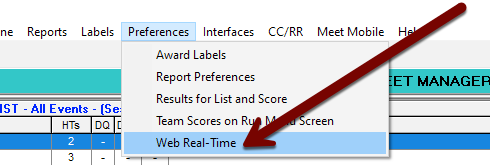
On the Run the Meet screen, select Preferences Web Real-Time from the menu bar.
Configure your settings to match the screen below. All items should be checked except for:
- Prior Round Results under Include in Heat Sheets / Performance Lists (this duplicates data that has already been uploaded and can slow the upload)
- Team Scores under Team Scores (AthleticLIVE auto-calculates team scores based on each result's point value)
- All Prior Round Results under Include in Results (this duplicates data that has already been uploaded and can slow the upload)
- Results by Heat/Flight and Compiled (AthleticLIVE will only display compiled results unless you upload heat-by-heat results using the
F11key in Meet Manager or you enable heat-by-heat results from FinishLynx)
That's it! You're ready to upload your results and entries to AthleticLIVE!
Having FTP Upload Issues?
Having upload issues? Check out the Common Upload Problems page for more assistance.
Uploading an Event Schedule
Open HyTek's Meet Manager, and then open the Run screen from the menu bar.

Once you're on the Run the Meet screen, choose Web from the menu bar.
Make sure Include Session Title if Sort by Session is checked.
Choose the Log-in tab, and then click Upload Event Schedule.
Within a minute, your session schedule will be available on AthleticLIVE. Viewers will be able to view the order of events and see which events have entries and/or results.
Upload Event Entries
Open HyTek's Meet Manager, and then open the Run screen from the menu bar.
Once you're on the Run the Meet screen, choose Web from the menu bar.
Select the Log-in tab.
When uploading event entries, you can choose to either upload heat sheets or performance lists, depending on what your meet host prefers. To upload performance lists, check the Upload Performance Lists only box.
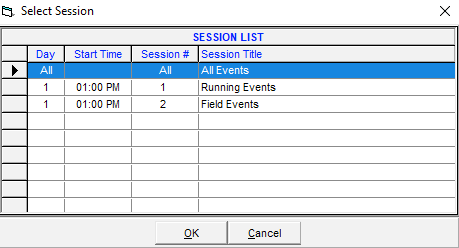
Click Upload Heat Sheets or Performance Lists for Rounds Not Done, then select a session or All Events from the popup and click OK.
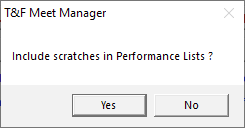
Choose whether you want to include scratches in the performance lists or heat sheets.
Performance Lists/Heat Sheets will begin uploading. After the upload is complete, a pop-up will say how many performance lists were uploaded.
Upload a Team File
Uploading a team file will allow you to publish heat-by-heat results and avoid truncated team names.
In Hytek's Meet Manager
From the home screen, select Schools or Teams from the menu bar.

Review the team list for accuracy, then click Export to HTML from the menu bar.

Choose where you'd like to save the file, and then click OK.

In AthleticLIVE
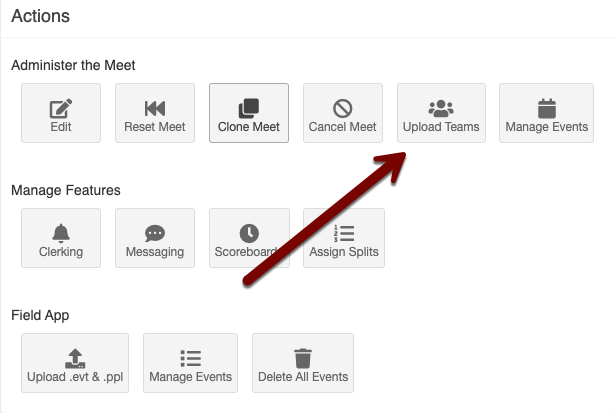
Access your Meet Details page and choose Upload Teams.
Click Choose File and select the file you just exported from Meet Manager.
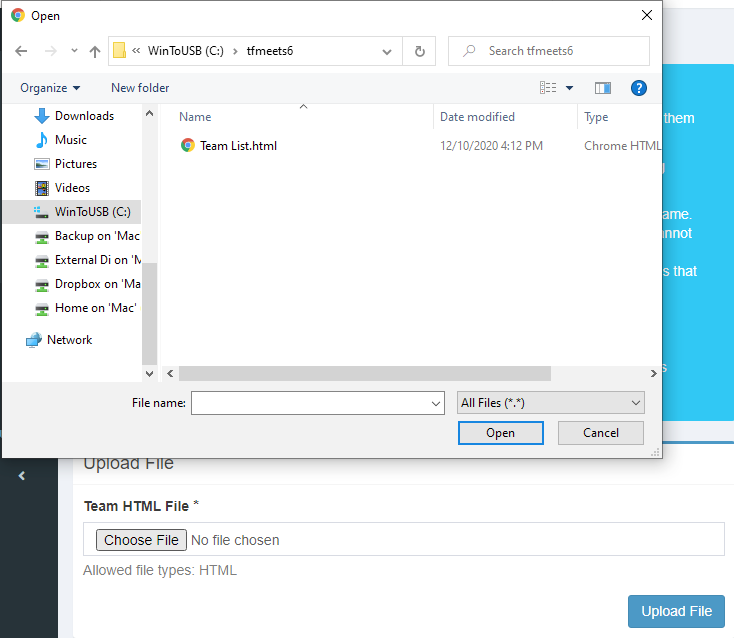
Click Upload File.
Your teams will be added to AthleticLIVE within a minute.
Upload Rosters
Using competitor numbers and uploading rosters ensures that you don't get any truncated names from HyTek's Meet Manager result uploads.
Additionally, you'll need to assign competitor numbers in Meet Manager. No changes from the default competitor numbering settings are necessary.
In HyTek's Meet Manager
Open the Run screen from the menu bar.

Select Preferences Web Real-Time from the menu bar.

Ensure that Include Competitor Number is checked.
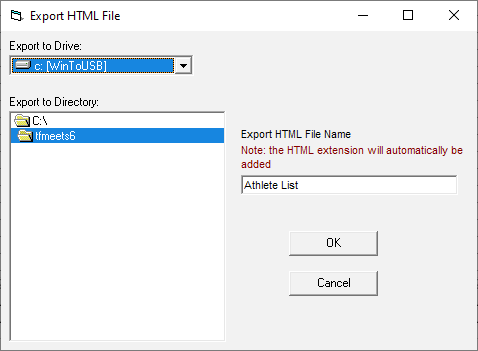
From the home screen or the Run the Meet screen, select Athletes from the menu bar.

From the Athletes screen, select Export to HTML from the menu bar.

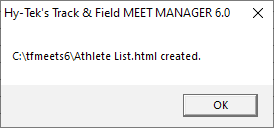
Choose where you'd like to save the file, and then click OK.
In AthleticLIVE
Access your Meet Details page and choose Upload Rosters.
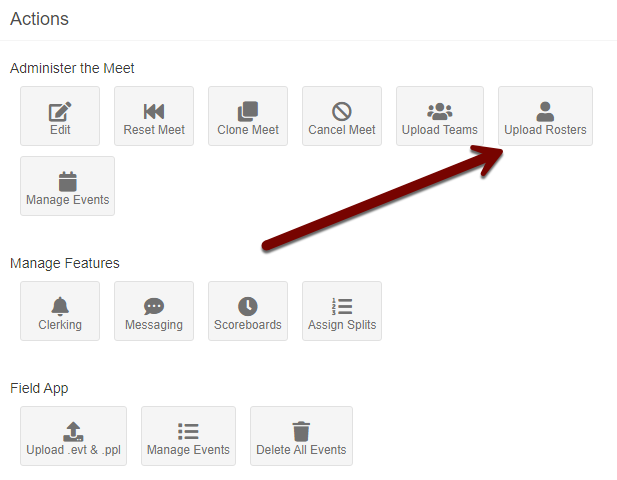
Click Choose File and select the file you just exported from Meet Manager.
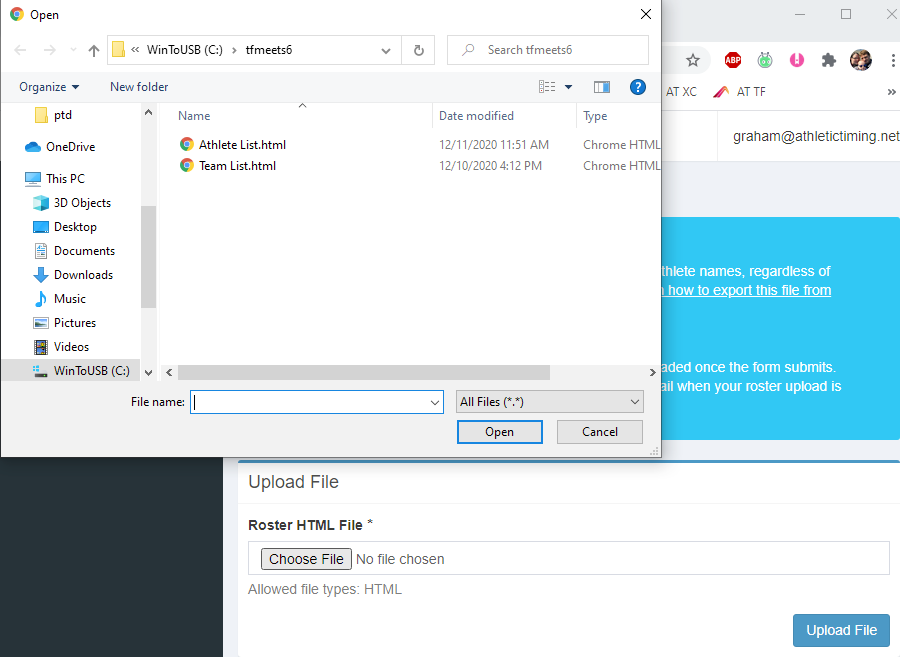
Click Upload File.
For small roster files, the athletes will be added to AthleticLIVE within a minute. For larger roster files, processing may take a bit. You will receive an email once the file has been processed.
Upload Final Results
Before uploading results, make sure you have completed the following tasks:
Upload results from a completed event
Once an event has been completed and/or scored, upload those results to AthleticLIVE by following these steps:
- Go to the Run Menu.
- Click on the completed event.
- Press F12 on your keyboard. The blue shaded bar near the bottom will show the status of your upload in red letters. It will flicker from "Creating Report for Event..." to "Sending Event Result to the Web...". Once it changes back to black text, the upload is complete.
The result should be viewable on AthleticLIVE within one minute. A new update will appear on the meet homepage, and the Events and Results pages will automatically show the new results without need for a refresh.
Upload results from a completed event -- CC/RR Module
For cross country races that use the CC/RR Module, use the following steps:
- Once ranks and times have been matched for a given race, click "Update".
- A pop-up box will appear informing you that results will be copied into the "Track database". Click "OK". Normally this is quick, but for large races (> 250 runners), it may take a minute or two to copy.
- Close out of CC/RR module.
- Click on the completed event.
- Press F12 on your keyboard.
Upload all results
If you have updated results for multiple events or are not sure which results you have uploaded, you can re-upload all results with the following steps:
- Go to the Run screen.
- Click Web.
- Click the Log-in tab.
- Click Upload Results for Completed Rounds.
- Choose the Session you want to upload, or choose "All Events". Click OK.
All results will be viewable on AthleticLIVE within 2-3 minutes.
Having upload issues? Check out the Common Upload Problems page and see if we can help.
Upload Heat by Heat Results
Hytek's Meet Manager has the capability to upload results for your events heat-by-heat, which allows your viewers to keep up with events as they happen, rather than waiting for the entire event to conclude.
Once you've entered the heat's results into Meet Manager, either by importing them from your FAT software or typing them in, you can upload that heat's results to AthleticLIVE.
To upload results for a particular heat, view the event and heat you want to upload on the Run the Meet screen in Meet Manager (the same screen you entered the results into). Once you've ensured the results are correct, press the F11 key. The blue bar above the heat buttons will display “Sending Heat Result to Web.” Once the message disappears, the heat was successfully uploaded and should appear on AthleticLIVE within a minute.
Having upload issues? Check out the Common Upload Problems page and see if we can help.
Division by Team Meets
The following section explains how to prepare AthleticLIVE for a Division by Team HyTek Meet.
In order to make your Division by Team meet show teams, events, and results correctly, please complete the following steps before uploading any events, entries, or results.
Step 1: Configure Divisions
- During the [meet creation process], check "Division by Team".
- Enter the division abbreviation AND the division name exactly as it's entered in HyTek.
Step 2: Upload Teams
Click here for instructions on how to upload teams
Step 3: Upload a Schedule
Click here for instructions on how to upload a schedule
By uploading entries, you create a "parent event" for each division's results.
From the events page, viewers can access results in two ways:
- From the "parent event". It will list a link to each division.
- From the events page. "Parent events" are listed alongside division events.
Once those 3 steps are complete, you're all set!
Step 4: Web Real Time Preferences
- Go to Run -> Preferences -> Web Real Time
- Uncheck "Results By Heat/Flight and Compiled"
Common Upload Problems
Below are some quick steps to take to troubleshoot common issues with HyTek FTP connection to AthleticLIVE.
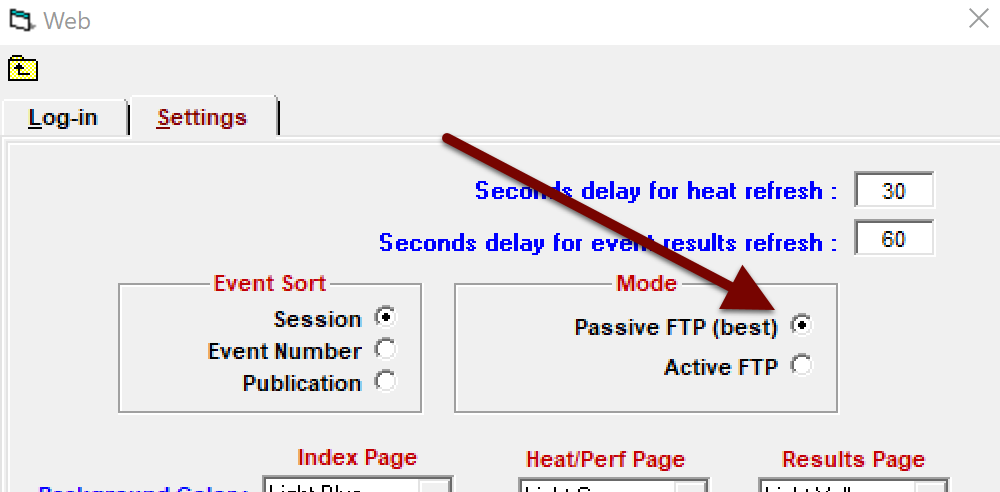
Make sure you are on Passive FTP
Go to Run -> Web -> Settings. Make sure "Passive" is checked under "Mode".
Make Sure F10, F11, and F12 are enabled
Go to Run -> Web -> Log-in. Make sure "Enable F10, F11, and F12 from Run" is checked.
Make sure HyTek is allowed to upload files
Go to Run -> Web -> Log-in. Make sure "Do not Upload" is NOT checked.
TMobile does not allow FTP
You cannot upload FTP data with TMobile. Find another provider or consider using the HyTek Database Connection.
School and Facility Internet rarely allows FTP
Try a hotspot or consider using the HyTek Database Connection.
HyTek is stuck on "Sending Event Result to the Web..."
If the blue bar above results has said "Sending Event Result to the Web..." for a few seconds, HyTek is having trouble uploading results. This is usually due to poor internet connection. If this message doesn't disappear in 60 seconds, try exiting and re-opening HyTek.
FTP Upload problem
If you see this dialog box, your computer is not connected to the internet.
Cannot upload. The User Name or Password may be invalid
If you see this dialog box, your FTP credentials are not working. Refer to your Meet Details page and try typing them in again. Hytek will not let you paste the password into the text field. Check your internet connection. Make sure you are on Passive FTP.
Cannot upload. The Working Directory path does not exist.
The working directory must be /
If you see this dialog box, your FTP credentials are not working. Refer to your Meet Details page and try typing them in again. Check your internet connection. Make sure you are on Passive FTP.
Connection Refused or Timeout
If you see either of these two pop-ups after trying to upload results, check your internet connection, and try closing and re-opening HyTek. If that doesn't work, contact our Support Center at live@athletic.net and we'll try our best to help.