Uploading Cross Country Results #3: Race Divisions
The Race Division matching process involves making sure that the results you are uploading get published under the correct race division heading. In other words, you're telling AthleticNET “this group of results is for the Varsity Girls 5k.” This is important when you have multiple race divisions either in your uploaded results or listed on AthleticNET.
A typical upload from a meet management software is shown here (this example shows Hy-Tek). The sets of results (race divisions) that were listed in the results file are shown on the left, and the Race Divisions that were configured in AthleticNET are shown on the right. Select the appropriate division from the dropdown menus to make the race divisions match.
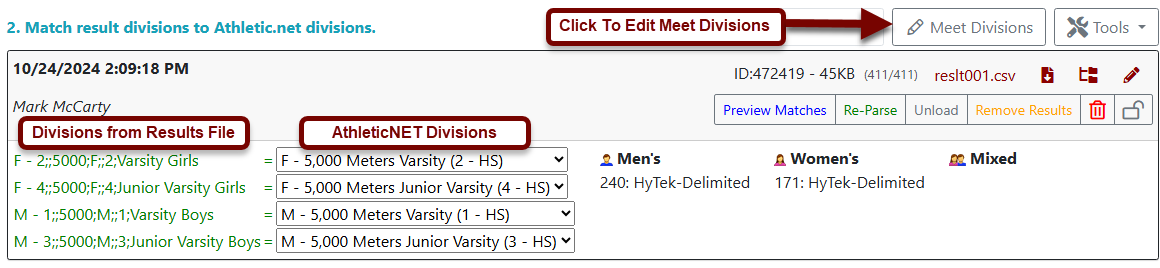
If you don't see the correct choices in the dropdown menus, you'll need to edit the AthleticNET meet divisions so that the results will be properly published. Click Edit AthleticNET Meet Divisions. You'll be presented with a screen where you can configure the race divisions that actually happened in your meet.

- Division Name: Type a name for your race division in the box, or select one from the dropdown menu. Results for this division will be displayed under this heading.
- Distance: Enter the distance of the race. Use the dropdown menu to select the measurement units.
- Start Time: Enter the race start time.
- ID: AthleticNET will assign each race an ID by default. If you make the ID number listed match the division ID in your meet management software, AthleticNET will automatically match up the divisions in any subsequently uploaded results files.
- Team Max: Used to set maximum number of athletes from a single team that may be entered into a race. Normally not necessary to configure if you're uploading results for a completed meet.
- Levels Competing: Select all levels that are competing in this race.
- Course: Used to add a course for the purposes of keeping course records. See Courses for more information.
- Advanced Settings: Advanced settings probably aren't necessary if you're uploading results for a completed meet. They have more to do with accepting entries beforehand.
- Delete: To delete this race division, click the .
- Add Race Division: Click to add another race division under the current gender.
- Merge Divisions: If you've decided that divisions that were separate now need to be combined, you can use the Merge Divisions button to combine them. Merging divisions will combine all entries in the merged divisions, as well as properly reconfiguring your events to reflect the new division structure. Clicking on Merge Divisions will display the merge options. Click on a division in the left-hand column to select a source division, and then click on a division in the right-hand column to select a destination division. For example, clicking on Junior Varsity in the left-hand column and then clicking on Varsity in the right-hand column will absorb the Junior Varsity division into the Varsity division. When you've finished configuring your race divisions, click Mark Complete at the bottom of the page.
Once you've configured all the race divisions that actually took place in your meet, click Close at the bottom. You'll be returned to the upload tab and you'll now be able to match the divisions in the results to AthleticNET divisions. Once you're done, continue to the Teams tab for the next step in the upload process.