Upload Teams and Rosters from Race Director
Uploading a list of teams and rosters to AthleticLIVE from your meet management software is a requirement for several functions to work. It is good practice to do so as a part of your setup for every meet. This article will walk you through uploading a team and roster list from The Race Director for an XC meet.
From the menu bar, select Reports Reports.
From the Reports screen, select Team Reports Registration Roster.

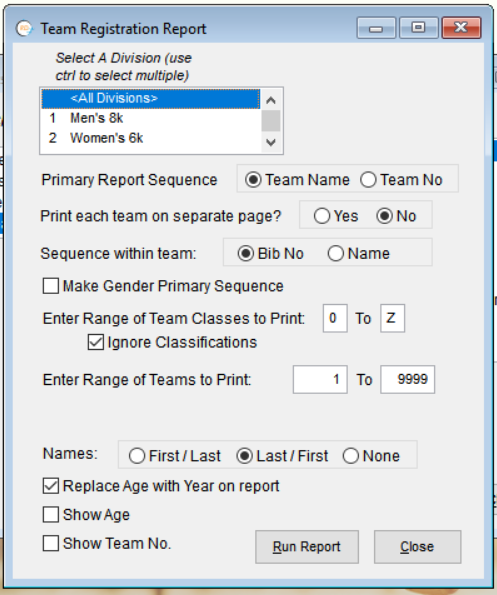
Make the following selections:
- Select a Division: <All Divisions>
- Primary Report Sequence: Team Name
- Print each team on separate page?: No
- Check the Ignore Classifications box
- Names: Last/First
- Check the Replace Age with Year on Report box

When prompted with Combine divisions or show separately?, choose Show Separately.
On the Print Report / Labels screen, select HTML, and then select Generate Report.

You'll be prompted to save the file. Enter teams.htm as the file name, and then click Save.
When prompted with Would you like to view or publish the file just created?, select Yes.
When prompted with Publish HTML file to server ftp.athletic.live?, select Yes.
Finally, click Send.

Subsequent questions may be answered as you see fit.
Before uploading rosters, make sure you have completed the following tasks:
Requirements
- Open your meet in Race Director.
- Go to Reports -> Team Reports -> Registration Roster.
- Choose "All Divisions".
- Set Primary Report Sequence to "Team Name".
- Set Print each team on separate page to "No".
- Check "Ignore Classifications".
- Set Names to "Last/First".
- Check "Replace Age with Year on report".
- Click "Run Report".
- Question: "Combine Divisions or Show Separately" -> Click Show Separately.
- Choose HTML Report Output.
- Click Generate Report.
- Enter a file name for your report. The report must have a ".htm" extension. We recommend naming the file
teams.htm. - Question: "Would you like to view or publish the file just created", choose Yes.
- Question: "Publish the HTML file to server ftp.athletic.live", choose Yes. (If you want to preview your file before uploading to AthleticLIVE, click "No". When you're ready to upload, you will need to go through this process again.) Click "Send".
- You're good to go. Answer the remaining questions as you wish.
Cross Country Finish List Settings

