Daktronics Scoreboards
This article will explain how to show live field results and standings data on Daktronics displays using Venus 8000 players.
AthleticSB can provide up to eight outputs for field event data from AthleticSB to Daktronics displays, and can display both individual ("up now") data and standings data.
Download the Files
Visit our downloads page and download the Daktronics File Package. The files will need to be distributed to various computers on your Daktronics network and your AthleticSB computer.
Copy the Files to Daktronics Computers
For Venus 8000 players, you'll need to copy files to locations both on the Venus 8000 servers themselves, as well as saving one to the Show Control computer.
Access to the Venus 8000 servers is usually provided on the desktop of the Show Control computer. Look for a folder on the desktop labeled "UltraVNC Connections" or "Remote Desktop Connections." In most cases, there will be shortcuts in this folder for "DMP-8000-P" and "DMP-8000-B." This is short for Digital Media Player 8000-Primary and Backup. If you have multiple screens in the facility, you may see DMP-8000 primary and backup units for each screen. These shortcuts will open a remote desktop viewer allowing you to access each DMP server.
For each primary and backup connection, use the File Transfer Utility (look for the file folder icon on the toolbar) within UltraVNC to transfer the following files to the DMP-8000 computers:
- AthleticFIELD.did must be copied to
C:\ProgramData\Daktronics\DDS\DIDon each DMP-8000 computer - The AthleticFIELD-DEV*.dsrc files (there are eight of these files, one for each data source) must be copied to
C:\ProgramData\Daktronics\VNET4\Dataon each DMP-8000 computer.
Once you've copied the files to the DMP-8000 servers, you'll also need to copy one file to the Show Control Computer itself.
- Copy AthleticFIELD.did to
C:\Program Files (x86)\Daktronics\Content Studio\StandardProfile
Configure the Profile Editor
The Profile Editor is a piece of software on your Show Control computer that associates data inputs and real-time-data fields so that AthleticFIELD real-time-data fields can be added to layouts in Content Studio.
- On the Show Control computer, open the Start Menu and access the Profile Editor software in the Daktronics Utilities folder. The username and password will be automatically generated.
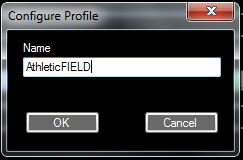
- Click the green icon under Profile: at the top of the window. Enter
AthleticFIELDand click OK.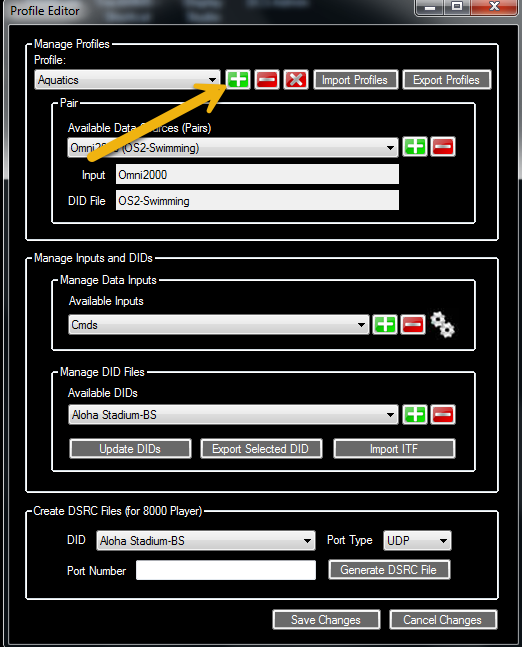
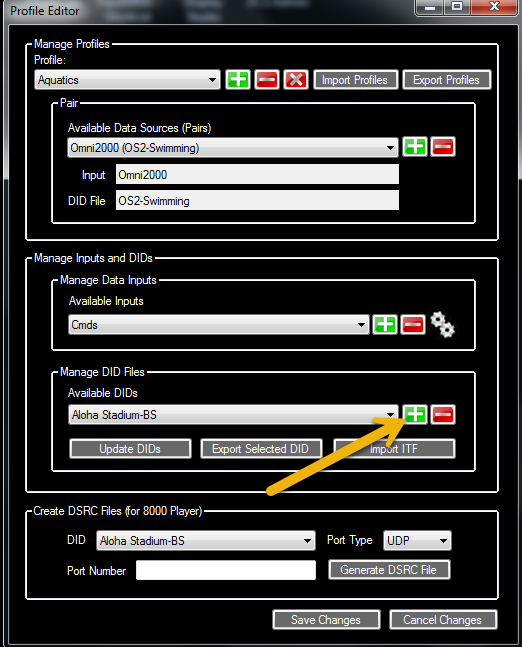
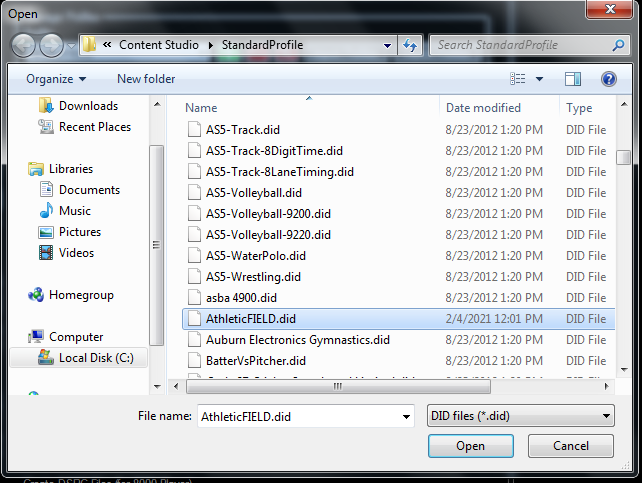
- In the Manage DID Files section, click the green icon, and then select AthleticFIELD.did from the list. Ensure that AthleticFIELD appears in the dropdown menu under Available DIDs.
- In the Manage Data Inputs, click the green icon.
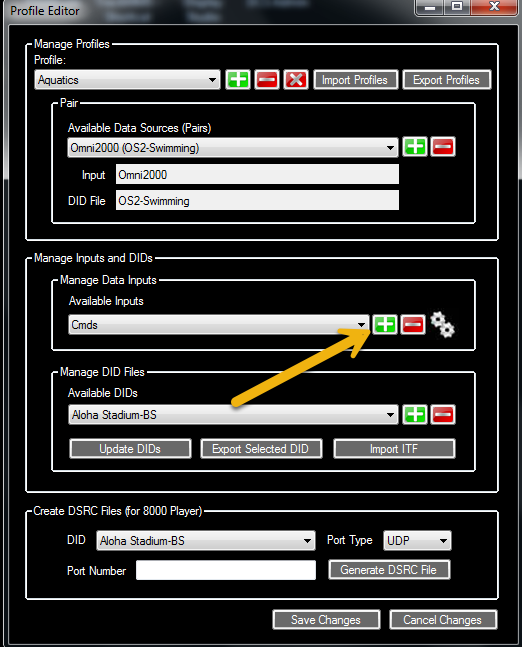
- In the Name field, enter
AthleticFIELD1. - Ignore the Number and Offset fields unless you're using a DMP-3000 or DMP-7000 unit. AthleticFIELD does support data input to DMP-7000s, but it is beyond the scope of this article. AthleticFIELD does not support DMP-3000s at this time.
- In the DSRC File Name field, enter
AthleticFIELD-DEV1.dsrc. This must be entered exactly as it appears here.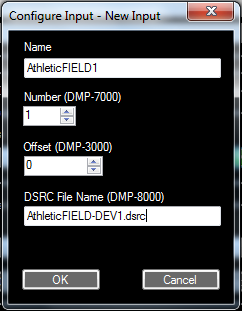
- In the Name field, enter
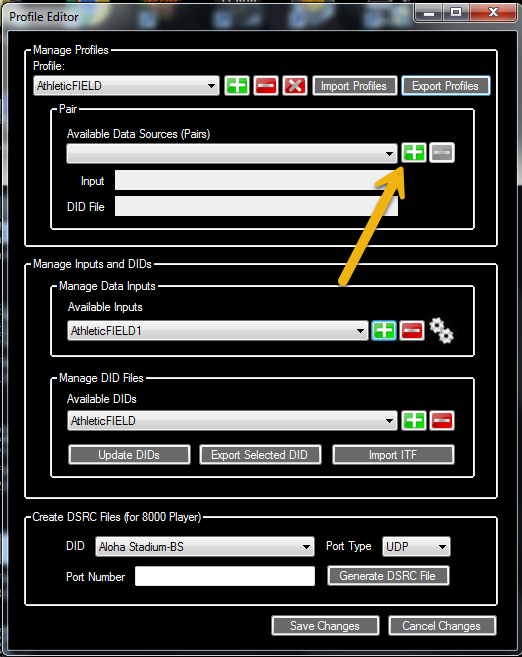
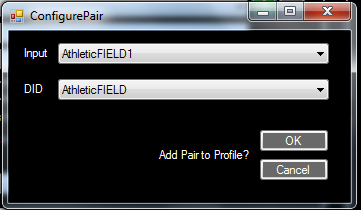
- In the Pair section, click the green icon. Select AthleticFIELD1 from the Input drop-down menu, and select AthleticFIELD from the DID drop-down menu. Click OK.
- Repeat steps 4 and 5 for up to 8 total inputs. For each subsequent input, increment the number by 1. For example, in step 4a you would enter
AthleticFIELD2, and in 4c you would enterAthleticFIELD-DEV2.dsrc. In Step 5, you would select AthleticFIELD2 from the drop-down menu.
- When you have created all your inputs, click Save Changes at the bottom of the Profile Editor window, and then close the program.
Setup AthleticSB
Create an AthleticSB LSS Data Output >
For individual results, use a Field Result data output.
For standings, use a Compiled Standings data output.
Send Event Data to Daktronics
After you've configured your data sources in AthleticSB, you'll see a list of data outputs
To send data for a particular event to Daktronics, use the Set Data button in the appropriate row to select an event, then click the green Play button.
For the Compiled Standings scoreboards, you have the option to either send a result list (i.e., the event standings), or a start list (the list of people in the flight, by throwing order). Sending a start list is useful if the field is being introduced over the PA system and you'd like to show their names on the screen.
Recommended Data Source Practices
- An Individual data feed (i.e., who's up right now and data about that person)
- A Standings data feed (i.e., the standings of everyone in the event as it currently stands)
As the day progresses, you can switch from event to event in the data outputs as some events end and others begin, always keeping a single event on a pair of data outputs. For example, once Long Jump ends, you can replace it with Shot Put on AthleticFIELD1 (up now) and AthleticFIELD2 (standings), and if Pole Vault is running at the same time, you can put Pole Vault on AthleticFIELD3 and AthleticFIELD4.
Create Display Layouts
Once you've configured your inputs, open Content Studio to start creating your layouts. You'll notice that under the Dynamic Data Library, you'll have a new entry in the Category drop-down menu, called AthleticFIELD. In this category, you'll have folders designated AthleticFIELD1-AthleticFIELD8. Each folder represents a separate data source, and contains data fields for display. Therefore, if you want to create a layout that will pay attention to the data source AthleticFIELD1 (i.e., UDP Port 23001), you'll drag data fields into your layout from the AthleticFIELD1 folder. If you wanted to create a hybrid layout that shows both who is up now as well as live standings for the same event, data fields for the "up now" portion of the display would be pulled from AthleticFIELD1, while data fields for the standings portion of the display would be pulled from AthleticFIELD2.
The following data fields are available for all AthleticFIELD data sources:
Event Name: The name of the event (e.g., "Womens Long Jump")Event NumberRound NumberFlight NumberLine 1; Place: The position in the standings of the athlete listed in the first row of the standings page currently being displayed, or the position in the standings of the athlete currently making an attempt.Line 1; Attempt: The attempt number of the athlete currently making an attempt (displays 3 if the athlete is about to make their third jump, for example).Line 1; ID: The bib number of the athlete.Line 1; Name: The name of the athlete listed in the first row of the standings page currently being displayed, or the name of the athlete currently making an attempt. See the name formatting options under Create Scoreboard Outputs above.Line 1; Affiliation: The team or other affiliation of the athlete listed in the first row of the standings page currently being displayed or that of the athlete currently making an attempt.Line 1; Mark:- For standings scoreboards, the athlete's mark that's being used to determine their place in the standings.
- For individual scoreboards, the result of the current attempt. Appears after the AthleticFIELD operator enters the mark and taps "save."
In vertical events, this will display the athlete's best cleared height as well as the vertical components (e.g.,2.75 XXO). For other options, see below.Line 1; Mark Converted: Same as above, but displays the measurement in the opposite units from those currently being used to measure (e.g., if the event is set up to measure in metric, then this field will display imperial units, and vice-versa).Line 1; Wind: The wind reading for the current attempt.Line 1: Mark (no vertical jumps): Displays the current mark without vertical components. Useful for showing the bar height in a vertical competition.Line 1: Vertical Components: Displays the vertical attempts (e.g., XXO) for the athlete at the current height.Line 1: Mark Converted (no vertical jumps): Displays the current mark in the opposite units from those currently being used to measure without vertical components. Useful for showing the bar height in a vertical competition.Line 1: Best Mark: Displays the athlete's best mark in the competition so far.
Supported fields for Standings Scoreboards
Standings scoreboards only support a limited subset of the fields shown above:
Event NameLine 1; PlaceLine 1; IDLine 1; NameLine 1; AffiliationLine 1; MarkLine 1; Mark Converted
All fields shown may be used for Individual Scoreboards.
Example hybrid field layout
This example is for a horizontal event. It would require two outputs from AthleticSB, in this case we'll use AthleticFIELD1 (Individual/up-now) and AthleticFIELD2 (Standings). In this example, the AthleticFIELD2 output would be configured to have Paging enabled, and Paging Size set to 9.
Event NameAthleticFIELD1 |
Line 1; NameAthleticFIELD1 |
Line 1; AffiliationAthleticFIELD1 |
Attempt: Line 1; AttemptAthleticFIELD1 |
Place: Line 1; PlaceAthleticFIELD1 |
Best: Line 1; Best MarkAthleticFIELD1 |
Line 1; PlaceAthleticFIELD2 |
Line 1; NameAthleticFIELD2 |
Line 1; AffiliationAthleticFIELD2 |
Line 1; MarkAthleticFIELD2 |
Line 2; PlaceAthleticFIELD2 |
Line 2; NameAthleticFIELD2 |
Line 2; AffiliationAthleticFIELD2 |
Line 2; MarkAthleticFIELD2 |
Line 3; PlaceAthleticFIELD2 |
Line 3; NameAthleticFIELD2 |
Line 3; AffiliationAthleticFIELD2 |
Line 3; MarkAthleticFIELD2 |
Line 4; PlaceAthleticFIELD2 |
Line 4; NameAthleticFIELD2 |
Line 4; AffiliationAthleticFIELD2 |
Line 4; MarkAthleticFIELD2 |
Line 5; PlaceAthleticFIELD2 |
Line 5; NameAthleticFIELD2 |
Line 5; AffiliationAthleticFIELD2 |
Line 5; MarkAthleticFIELD2 |
Line 6; PlaceAthleticFIELD2 |
Line 6; NameAthleticFIELD2 |
Line 6; AffiliationAthleticFIELD2 |
Line 6; MarkAthleticFIELD2 |
Line 7; PlaceAthleticFIELD2 |
Line 7; NameAthleticFIELD2 |
Line 7; AffiliationAthleticFIELD2 |
Line 7; MarkAthleticFIELD2 |
Line 8; PlaceAthleticFIELD2 |
Line 8; NameAthleticFIELD2 |
Line 8; AffiliationAthleticFIELD2 |
Line 8; MarkAthleticFIELD2 |
Line 9; PlaceAthleticFIELD2 |
Line 9; NameAthleticFIELD2 |
Line 9; AffiliationAthleticFIELD2 |
Line 9; MarkAthleticFIELD2 |