Toe Board Image Exports with VeriLynx
This article explains how to automatically export images from VeriLynx.
Description
As you mark attempts in VeriLynx, AthleticLOCAL automatically exports an image from the image that you clicked on to ensure it matches the correct jump board. Images are branded with your logo (if you have an Enterprise site) and the AthleticLIVE logo.
Requirements
The following software is required to send export and upload VeriLynx images to AthleticLIVE.
- VeriLynx software and hardware
- alive-verilynx-image-gen.lss output script
- AthleticLOCAL v1.1.0 or greater
- AthleticFIELD v1.14.3 or greater or FieldLynx must be used for live field results
- Email live@athletic.net if you want to use this functionality. We need to enable it on your account.
Part 1: Configure VeriLynx
Configure the Remote Control Plugin
- Go to hidden settings File -> Control + Shift + Options
- Set RemoteControl -> SerialPort to
-2,0.0.0.0,7101 - The last number of this setting is the port AthleticLOCAL will use to send image export requests to VeriLynx. Use 7101 unless that port is already in use by another program (it probably isn't).
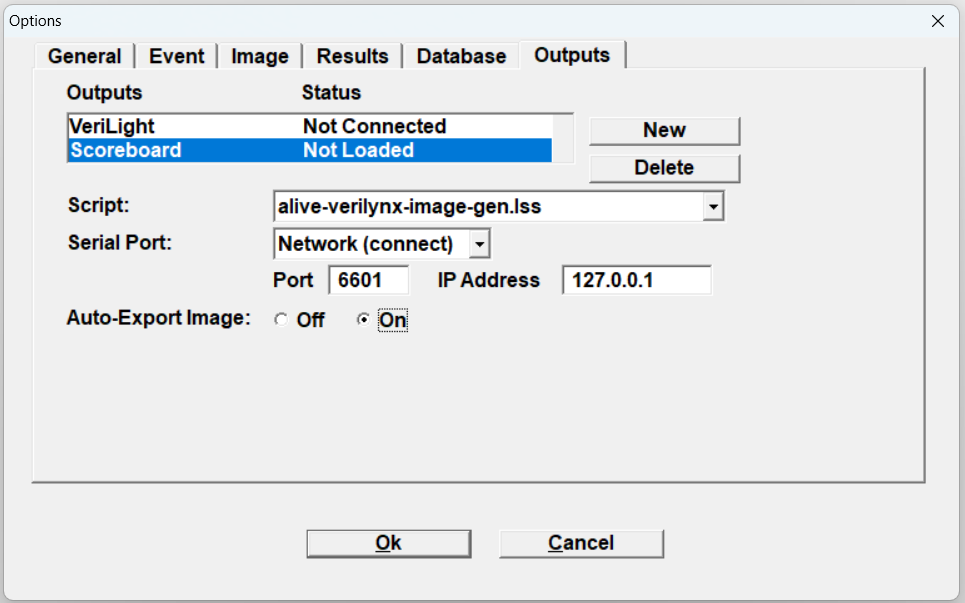
Set up an output to send results to AthleticLOCAL
VeriLynx must tell AthleticLOCAL when a mark is ready for image export via this output. Create a new output under File -> Options -> Outputs.
- Script: alive-verilynx-image-gen.lss
- Serial Port: Network (connect)
- Port: This should match the AthleticLOCAL Port you will set in AthleticLOCAL later. Port 6601 is the recommended default.
- IP Address: Enter the IP address of the computer running AthleticLOCAL
- Auto-Export Image: On
A couple of more scoreboard settings need to be changed in the hidden settings. Open the hidden settings by going to File -> Control + Shift + Options. Then navigate to Scoreboards -> 3. (Or whichever scoreboard is the one you just added. It should be at the bottom of the list, or you can check the script property for the scoreboard with alive-verilynx-image-gen.lss as the script.)
- Name: "ALive Image Gen" or something else that you will recognize
- TimePrecision: 80
- PageMode: 0
- IncludeFirst: 1
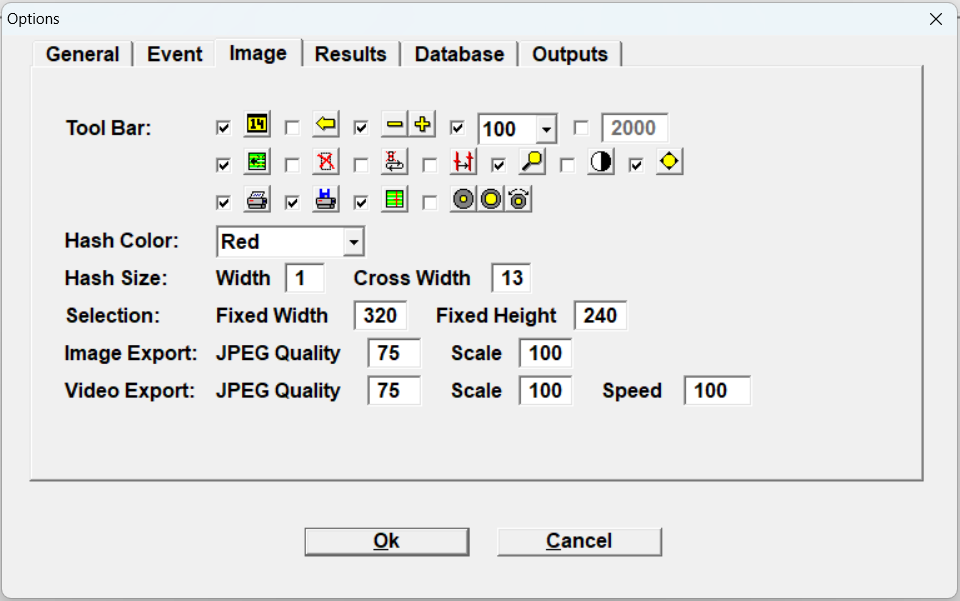
Image Export Settings
It is possible to adjust the image export quality to achieve higher or lower quality.
- Open the Image -> Options
- Set the Image Export: JPEG Quality to 100 instead of 75
Export Directory
Images are exported to the Export Directory in File -> Options -> Database -> Export Directory. If you change this value, you must restart VeriLynx.
Part 2: Configure your Meet Management System
- Both to use AthleticFIELD and VeriLynx images, athletes must have competitor numbers.
- Upload a roster with competitor numbers before the meet begins HyTek MeetPro.
- Results must contain competitor numbers. This happens by default in MeetPro. In HyTek, you must go to Run -> Preferences -> Web Real-Time and check "Include Competitor number".
Part 3: Configure your AthleticLIVE Meet
- Edit your meet at admin.athletic.live
- Near the bottom of the form under "Image/Photo Settings", select "VeriLynx Image Export" for "Toe Board Image Export System". If you do not see this option, email live@athletic.net. We need to turn this functionality on for your account.
- Save the meet
Part 4: Configure AthleticLOCAL
- Open AthleticLOCAL (v1.1.0 or greater)
- Choose an active meet
- You should see VeriLynx Image Export as some of the available upload protocol options. Ensure these port numbers, IP address, and directory match your setup.
- Map this computer to the VeriLynx Output Directory. Make sure the drive letter matches the VeriLynx Output Image Directory in your config.
Test It
Use the Testing feature to make sure your connection works and to get your images as perfect as possible
- Open a previously-saved VeriLynx event
- After starting your active meet in AthleticLOCAL, navigate to "VeriLynx Export Test" in the sidebar under "Meet Settings"
- Enter the time of day you want to export at, and click "Submit". Keep in mind that due to how VeriLynx keeps track of time, you may need to enter the time of day to the thousandth of a second to get the correct frame export even if you are only capturing at 30 frames per second.
- If everything worked, you will see the exported image at the top of the page automatically
- Try another test with a different time
Running an Event
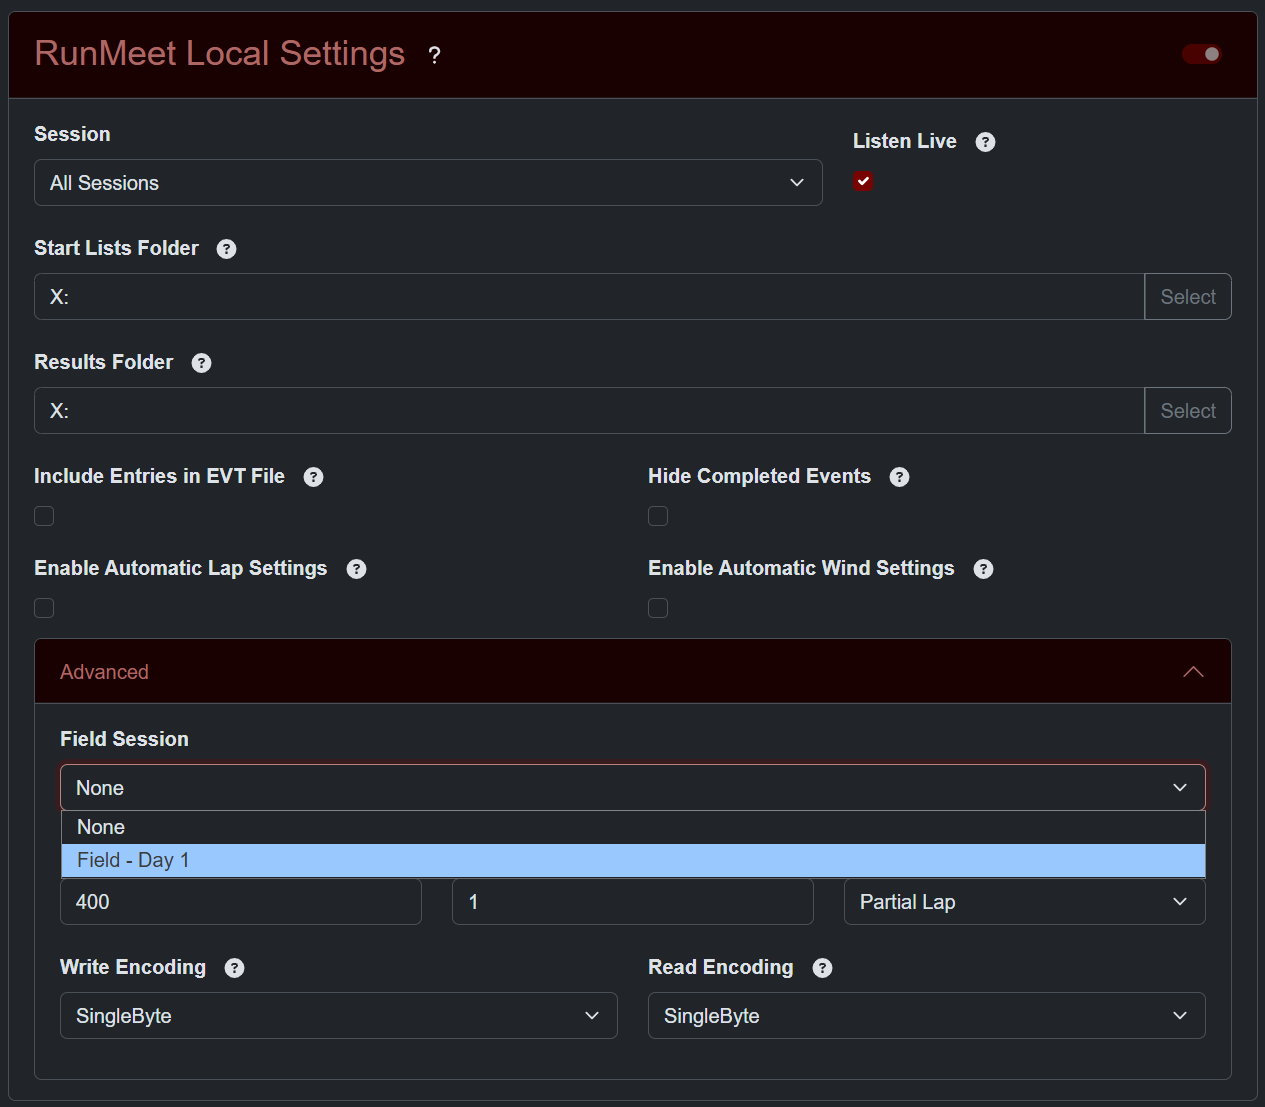
- Make sure you have your EVT/SCH/PPL start list files on your VeriLynx machine before the event starts. See the AthleticFIELD docs here for instructions for HyTek and MeetPro. If you are using RunMeet, select your desired field session under RunMeet Local Settings -> Advanced -> Field Session when starting AthleticLOCAL to produce these files automatically.
- Open up an event and capture/mark your toe board images like normal. When you hit enter to save an attempt, AthleticLOCAL will automatically export an image, upload it to AthleticLIVE and tag it to the live results.
- If your event has finals, the finals flight needs to be setup in VeriLynx as the same event number and round number as flight 999. This is so AthleticLIVE knows to adjust the 1st attempt from finals and make it the athlete's 4th attempt, for example.
- If you are using RunMeet, this flight should be generated automatically when you create finals in AthleticFIELD, but you may need to click "Load Schedule" in VeriLynx to get the new flight to show up.
- If you are not using RunMeet, you will need to edit the lynx.evt file to add the flight as shown below in the bottom line of the example below. Then when you open the flight you will need to add blank result rows and type in each athlete's competitor number into the ID field so their name and affiliation auto fill from the lynx.ppl file.
22,1,1,Boys Shot Put Varsity
,800,1,Kepie,Evjap,TEST Tigard
,421,2,Vicecu,Nidjaem,Test Southridge
,584,3,Nuppt,Itaad,TEST West Salem
22,1,2,Boys Shot Put Varsity
,727,1,Tdjpemm,Naz,TEST Grant
,1000,2,Djaweb-Moph,Nasdot,TEST West Salem
,551,3,Hesjasf,Nidaj,TEST Tigard
22,1,999,Boys Shot Put Varsity
Notes
- AthleticLOCAL exports toe board images one at a time. If you open previous event with 12 athletes with results, AthleticLOCAL won't export any. You have to start from a clean slate and as you click finishers one at a time, AthleticLOCAL will export those images.
- VeriLynx only sends the time of the last attempt to AthleticLOCAL, so if you make a mistake and need to adjust an earlier attempt, AthleticLOCAL won't export out the earlier attempt image again unless you delete the later attempt and re-click to enter all attempts after the one that is being adjusted.
- Verilynx can be configured to either export or hide the hash line on image export. In hidden settings, modify the setting
Event-->Image-->ExportBitmap-->ShowHash