Sending Field Data to Local Scoreboards
Combining AthleticSB and AthleticField gives you the power to feed live field event information directly to ResulTV/Dak or other local scoreboards in your venue. This document will walk you through how to set that up, and what options you have for display.
Configure AthleticSB
Create an AthleticSB LSS Data Output (learn more)
Configure ResulTV
You can send data to any local scoreboard software you wish. This explains how ResultTV can receive this data. If you are looking for a way to show data on local scoreboards without lots of setup, consider AthleticSB Field Result boards.
If you're not currently using FieldLynx, download AthleticField_RTV_Results.lss from our downloads page and place it in a folder on your AthleticLIVE Local computer where it won't be moved or removed.
If you're currently using FieldLynx, select the location of the FieldLynx LSS files. This is normally C:\Program Files (x86)\FieldLynx. If you're not using FieldLynx, enter the location of the AthleticField_RTV_Results.lss file you downloaded above.
While we encourage you to attempt to use any existing layouts and scoreboard scripts you may already have been using with FieldLynx and ResulTV, we offer the AthleticField_RTV_Results.rss script (available on the downloads page) to use with ResulTV. It offers a number of unique data fields that will enhance the features and flexibility of the data you're displaying.
Create a New Source
The first step in configuring ResulTV to work with AthleticLIVE Local and AthleticFIELD is to create a new source in ResulTV. This tells ResulTV where to listen for AthleticFIELD data.
From the main ResulTV screen, choose File and then Options, then navigate to the Sources tab. Click New and then configure the new source as shown here:
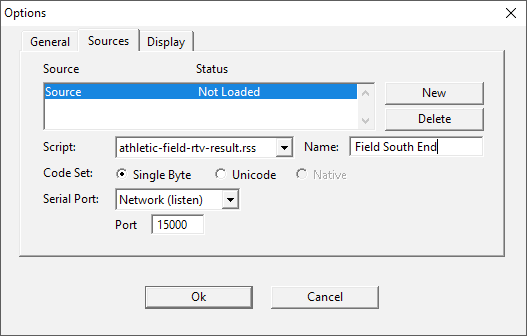
You can name the source whatever is pertinent, but we recommend naming it the same as the corresponding scoreboard name you configured in AthleticLIVE Local. Code Set should be set to Single Byte, just like in AthleticLIVE Local, and the Port field should match the port number you defined above.
Once you're done configuring your sources, click OK, and then restart ResulTV for your new sources to load.
AthleticFIELD Data Fields
We have created a sample ResulTV layout for you to get started with, and it can be downloaded from our downloads page: AthleticField_RTV_Results.rtv
It is capable of displaying the following fields:
- Event Name
- Competitor Name (simply called Name)
- Affiliation
- Place
- Attempt number (called Attempt)
- Mark displays:
- Mark displays the mark for the current attempt exactly as it was entered, including vertical event notation (i.e., XXO, XO, etc).
- Mark (Converted) displays the mark in the opposite measurement from which it was entered (e.g., marks entered in English will be displayed in Metric, and vice-versa). It will also include vertical event notation.
- Mark (No Vertical Attempts) will display the mark in the measurement system it was entered, but will not include any vertical event notation.
- Mark (Converted + No Vertical Attempts) will display the converted mark (opposite measurement system) without any vertical event notation.
- Best Mark will display the athlete's best attempt during the competition in the measurement system in use for the event.
- Wind
- Vertical (displays vertical event notation for the current bar height).
On the Basic tab, choose Local Override, and then Selected Sources. From the dropdown menu next to Selected Sources, select the source name you'd like the field to listen to. Ensure that only one item is checked!