Athlete Communication Features
As a coach, keeping track of all the moving pieces of a busy team can sometimes be challenging. That's why AthleticNET offers communication features to help you keep your athletes informed of team happenings. AthleticNET's communication features allow you to quickly and easily contact athletes and their parents or managers and send important messages with just a few clicks. Using these tools allows you to create and save pre-programmed messages that can be sent to all athletes in seconds.
First, you'll need to access your team's roster. To access your team's roster, navigate to your team's homepage by clicking on the Menu Icon () in the top left corner, and then clicking on your team's name. Then, click on Manage Team in the top menu bar, and then Athletes.
Adding Athlete Contact Information
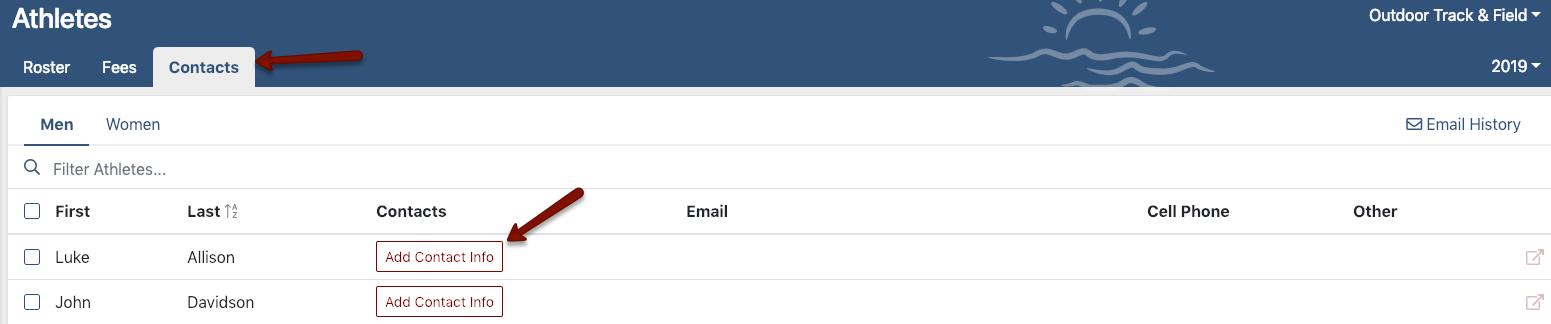
Once you've accessed your team's roster, click on the Contacts tab. For each athlete in the list (Men and Women are on separate tabs), you can click Add Contact Info.
From the following screen, you can add various types of contact information for the athlete. The Add Contact Info for drop-down box allows you to choose whether you're adding contact information for the athlete him- or herself, the athlete's parent or guardian, or another type of athlete manager. You must enter an email address, and in the case of a contact other than the athlete, you must enter a first and last name. All other fields are optional.
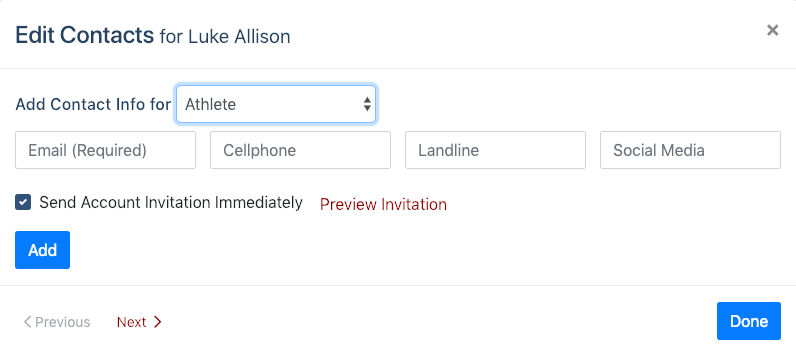
Checking the Send Account Invitation Immediately box will send an invitation to the email address entered, inviting them to create an account on AthleticNET. Not only does this encourage your athletes to take advantage of the athlete tools on Athletic.net, but it also provides you with an indication that the email address is a valid email, since the email address is verified as part of the signup process. Once you've decided whether or not to send an invitation, click Add. You can use the Previous and Next links to go to other athletes in the list, or you can use the Done button to return to the roster.
Sending Emails
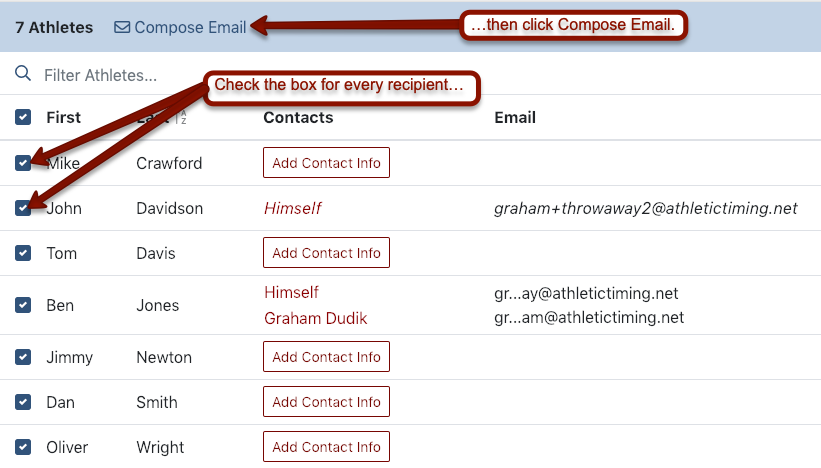
To send an email, check the box next to every recipient you'd like to send the email to. If you'd like to send it to everyone on the roster, check the box at the top of the list. Next, click Compose Email.
Next you'll see the compose email screen, which has a number of features to make large communications with your team easy.
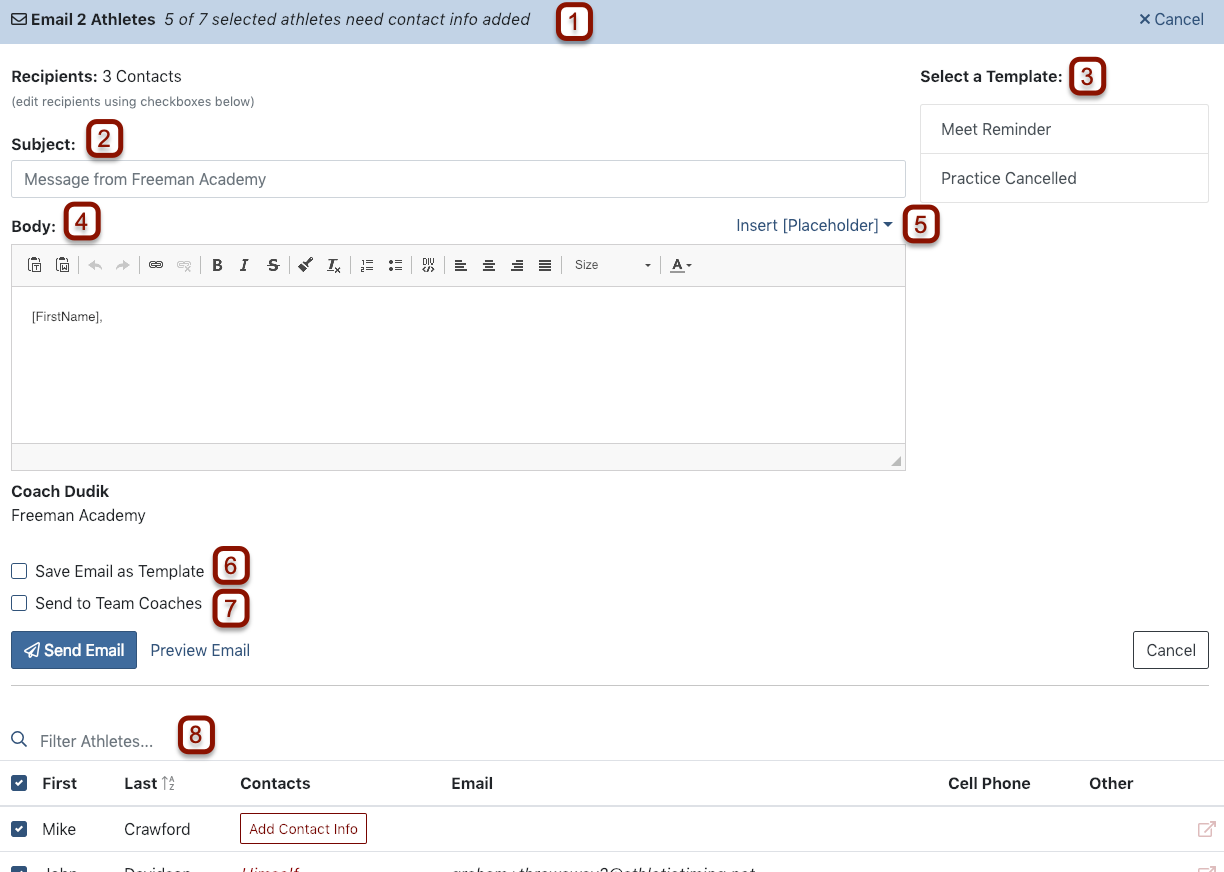
- Recipient counter: This tracks the number of athletes you're sending the email to, and warns you if one or more of them do not have email addresses on file. You can add those email addresses in the recipient list below.
- Subject: The subject line of your email.
- Template selection: You can select from a pre-prepared template email here. Emails you commonly write can be saved as a template for quicker access in the future. Once saved, they will appear in this list. To save an email as a template, see item 6 in this list.
- Body: The body of your email gets written here. There are a number of formatting options available for you to get your point across!
- Placeholders: A placeholder is a piece of data (e.g., a name) that will change for each email that is sent (similar to a mail merge). Inserting a placeholder will insert the appropriate field for each recipient into the email as it is sent. In the text, it will appear as a description surrounded by brackets. You can select and insert a placeholder using this list.
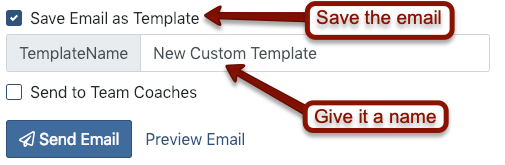
- Save Email as Template: Checking this box will save the email you've just written as a template after you send it. See the next section for more information.
- Send to Team Coaches: Checking this box will reveal a list of your team's coaches. Check the box next to each coach's name if you'd like them to receive this email as well.
- Recipient List: This list shows all the athletes who will be receiving the email, and which email addresses the email will be sent to. Check the box next to an athlete's name to add them to the recipient list. If you have no email address listed for them, clicking Add Contact Info will let you quickly add their email address.
Using Templates
If you find yourself writing the same messages to athletes over and over again, you should consider using a template. A template is a pre-prepared, pre-formatted email that can be whatever you want! Write it once, save it, and send it countless times!
The first step to creating a template is to simply write the email. Use placeholders if necessary, and make it look just how you want. When you're done, check the box labeled Save Email as Template. Give your template a descriptive name; this name will appear in the template list when you send future emails.
The next time you want to send this email, start a new email, and select your template from the list on the right. The email, exactly as you wrote it, will appear in the compose box. Make any necessary modifications, ensure your recipients are correct, and then send it!