AthleticRUNMEET: Setup and Settings
In order to use AthleticRUNMEET features on your meet, you'll need to configure some options first. This allows the AthleticRUNMEET features such as seeding and reporting to respond properly to the way you want your meet run.
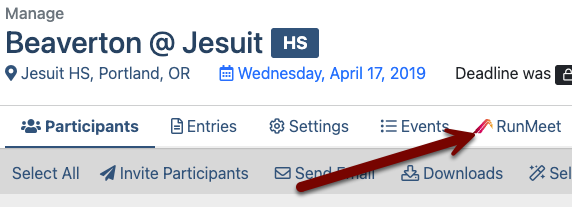
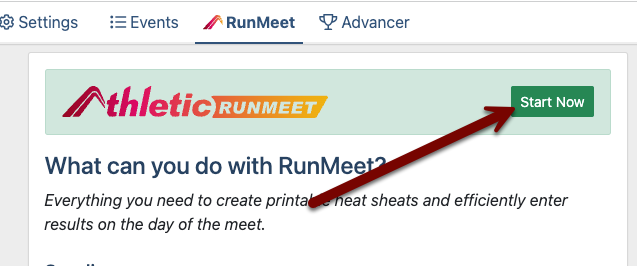
After you've completed meet setup (see Creating a Track & Field Meet #1: Introduction), you'll see AthleticRUNMEET at the top of the Manage Meet screen. Clicking on AthleticRUNMEET will open a list of features. Click on Start Now to begin configuring your settings.
Initial Setup/Global Settings
Clicking on Start Now will begin a synchronization process that will take a few moments. After that's completed, you'll be presented with the first of a few configuration screens.
Track Settings
This first screen will ask you about details of your meet in order to properly configure the running events.
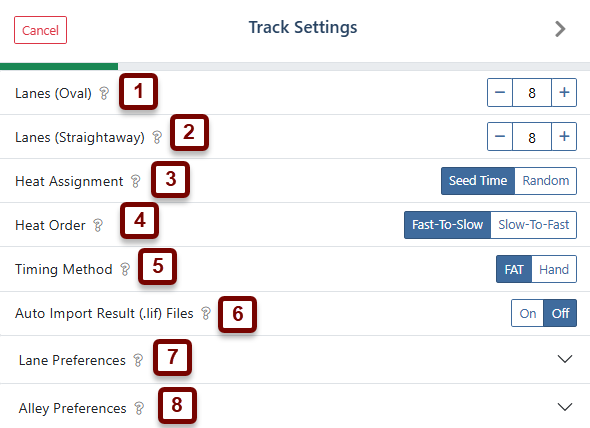
- Lanes (Oval): Select the number of lanes on your track that go all the way around the track.
- Lanes (Straightaway): If your track has a different number of lanes on the home stretch versus the rest of the track, enter that number here. For example, you may have six lanes around the whole track, but eight on the home straightaway. If you have the same number of lanes all the way around the track, the number here should match the number of lanes in the oval above.
- Heat Assignment: Select how runners are assigned to their heats.
- Seed Time: Runners will be organized into heats based on similar seed times.
- Random: Runners will be randomly assigned to heats.
- Heat Order: Select in which order you'd like to run heats.
- Fast-to-Slow: Heats with the fastest athletes will be run first.
- Slow-to-Fast: Heats with the slowest athletes will be run first.
These seeding settings are global defaults. You can override these settings for any individual event. See Seeding for more information. - Timing Method: Select whether the times you'll enter for results will be generated by a Fully Automatic Timing system, or by hand-timing. If you select hand timing, a conversion factor will be applied to the results when they are posted to AthleticNET. See Hand Time Conversion Standards for more information.
- Auto Import Result (.lif) Files: When you're using AthleticRUNMEET with a FAT system, this setting will automatically import results from your FAT system whenever a results file is created or updated. See Using AthleticRUNMEET with Fully Automatic Timing for more information.
- Lane Preferences: Opening this panel will allow you to configure preferential lanes for your track. See Lane & Alley Preferences for further information.
- Alley Preferences: Opening this panel will allow you to configure preferential alleys for your track. See Lane & Alley Preferences for further information.
When you're done, click the Next button () at the top of the screen.
Field Settings
The following screen will ask about details of your meet in order to properly configure field events.
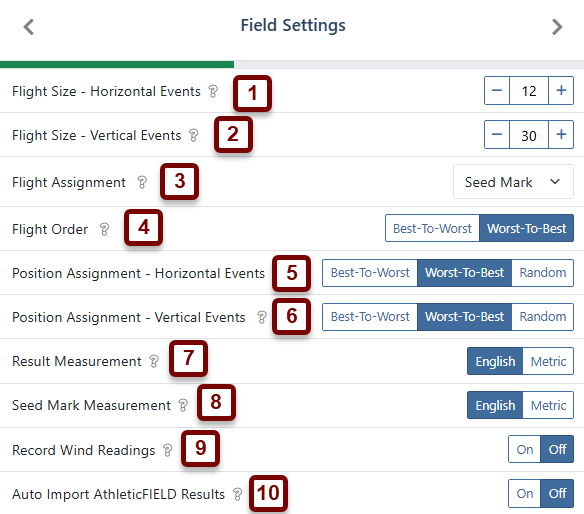
- Flight Size - Horizontal Events: Select the default number of competitors you'd like to appear in horizontal events (long jump, triple jump, and all throws). This setting may be altered later and each event may be customized individually.
- Flight Size - Vertical Events: Select the default number of competitors you'd like to appear in vertical events (high jump and pole vault). This setting may be altered later and each event may be customized individually.
- Flight Assignment: Select how competitors are assigned into flights.
- Seed Mark: Competitors will be organized into flights based on similar seed marks.
- Random: Competitors will be randomly assigned to flights.
- Alphabetical: If you're running the event as an open pit, seeding the competitors alphabetically into one large flight may help you find their names on scoring sheets more easily.
- Flight Order: Select the order in which you'd like flights to compete.
- Worst-to-Best: Flights containing athletes with the worst seed marks will compete first.
- Best-to-Worst: Flights containing athletes with the best seed marks will compete first.
- Position Assignment (Horizontal Events): For horizontal events (long jump, triple jump, and all throws), select how the competitors within each flight should be organized.
- Worst-to-Best: Athletes with the worst seed marks will be at the beginning of the competition order.
- Best-to-Worst: Athletes with the best seed marks will be at the beginning of the competition order.
- Random: Athletes are assigned start positions randomly.
- Position Assignment (Vertical Events): Same as above, but applied to vertical events (pole vault and high jump)
- Result Measurement: Select the unit of measurement that will be used during the meet to enter field event results, Metric (meters and centimeters) or English (feet and inches).
- Seed Mark Measurement: Select the unit of measurement for inputting and displaying field event seed marks, Metric (meters and centimeters) or English (feet and inches).
- Record Wind Readings: Select whether you'd like a space to record wind readings for Long Jump and Triple Jump on scoring sheets.
- Auto Import AthleticFIELD Results: When you're using AthleticRUNMEET with AthleticFIELD, this setting will automatically import results from AthleticFIELD whenever a results file is created or updated. See Using AthleticRUNMEET with AthleticFIELD for more information.
When you're done, click the Next button () at the top of the screen.
Scoring Setup
The next screen you'll be presented with is a scoring configuration screen.
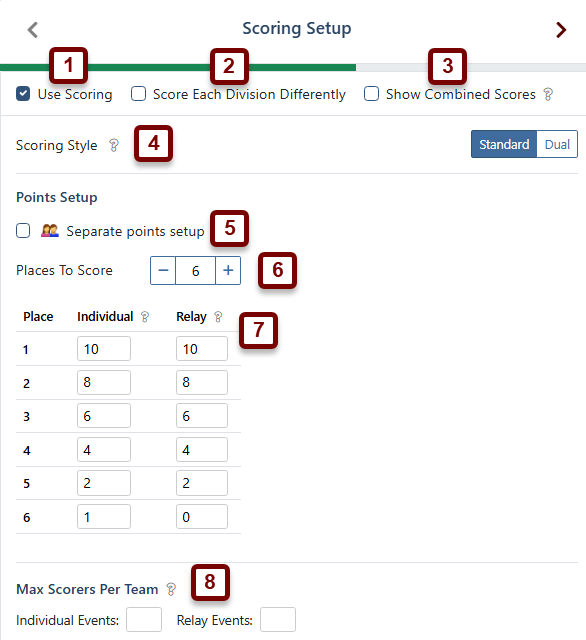
- Use Scoring: Check the box if the meet should be scored.
- Score Each Division Differently: If you'd like to have different scoring configurations for different divisions (i.e., Varsity, JV, etc), check this box. You'll be presented with a dropdown menu allowing you to select which division the scoring configuration applies to.
- Show Combined Scores: When checked, this will show the combined total of all scores for each division in addition to each division’s score.
- Scoring Style: Select Standard for multi-team invitational meets where a single list of scoring teams is compiled. Select Dual for dual and double-dual meets where each team will be scored against each other team competing.
- Separate Points Setup: Check this box if you want to setup a different scoring configuration per gender.
- Places to Score: Select how many top placers will score.
- Points Setup: Enter the point values for each place for individual events and relay events.
- Max Scorers Per Team: If you need to configure a maximum number of scorers per team, enter the maximum number of scorers from a single team allowed for Individual Events and Relay Events.
When you're done, click the Next button () at the top of the screen.
Competitor Numbers
The next screen will ask you if you want to configure competitor numbers. You can choose to assign competitor numbers now or return to it later. See Assigning and Using Competitor Numbers for more information.
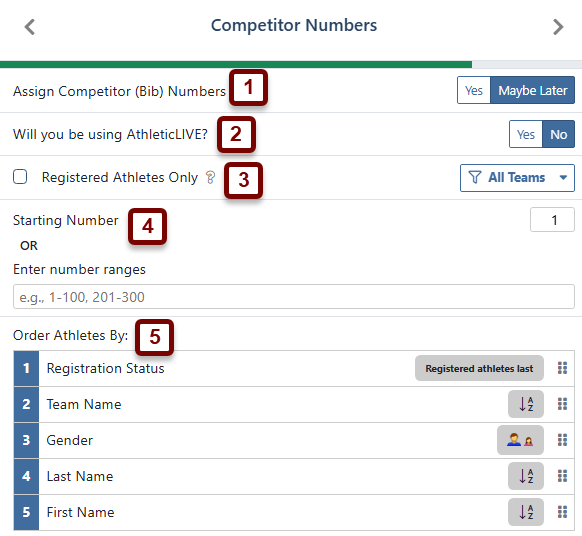
- Assign Competitor Bib Numbers: It never hurts to assign bib numbers to your meet, but you will be required to if you are using AthleticLIVE or using physical bib numbers at your meet.
- Will you be using AthleticLIVE? If you're going to be using AthleticRUNMEET with AthleticLIVE, all athletes will be assigned competitor numbers, even if you aren't using them at the meet itself. This is necessary for AthleticLIVE to work with RunMeet.
- Registered Athletes Only: Toggle this on if you will be using physical bib numbers at your meet and only have a limited amount of bib numbers for your meet. Otherwise, keep toggled off if you are simply assigning bib numbers for AthleticLIVE purposes.
- Starting Number or Number Range: Used to matched the bib numbers that you will have on the day of the meet.
- Order Athletes By: Gives you options for the order in which you want bib numbers assigned. Click on the gray box to swap the preference (ex: boys first or girls first, A to Z or Z to A). Click the grip dots to rearrange the order of preferences.
When you're done, click the Next button () at the top of the screen.
Seeding
The final screen allows you to configure some miscellaneous seeding options
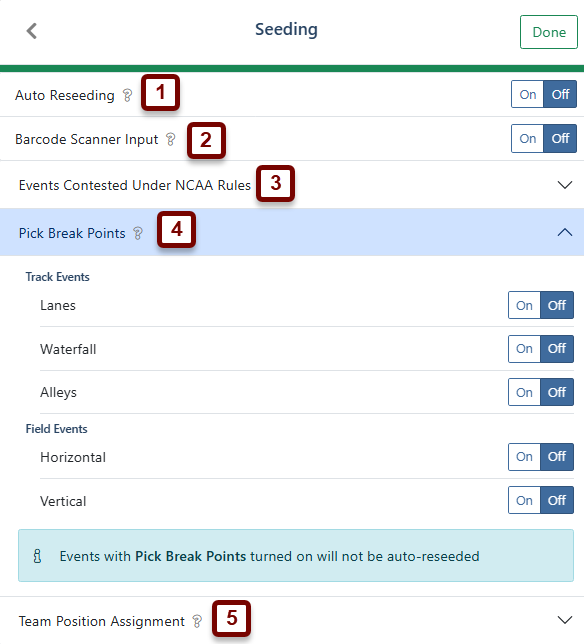
- Auto-Reseeding: Auto-Reseeding configures AthleticRUNMEET to automatically reseed any event that has any details changed that affect seeding, such as an entry being added or removed or a seed mark edited. For more information, see RunMeet: Seeding Auto Seeding.
- Barcode Scanner Input: If you will be reseeding at the meet, this allows you to add athletes to empty lanes using a barcode scanner.
- Events Contested Under NCAA Rules: When turned on, this will default all of your events to settings consistent with the NCAA Track and XC Rule Book.
- Pick Break Points: Allows you to select whether you'd like to set Break Points manually when seeding various types of events. See Setting Break Points for more information.
- Team Position Assignment: Allows you to configure various types of team-based lane or position assignments for your events. See Setting Team Position Preferences for more information.
When you've completed this, click Done and you will be taken to the seeding screen. For information on how to customize each event's settings or how to manually seed an event, see AthleticRUNMEET: Seeding.