RunMeet: Seeding
Once you've finished your initial setup of the meet, the system will seed the events in your meet based on the settings you selected. However, in any meet, some events need to be configured differently based on characteristics specific to the meet or event. This article will serve as an introduction to the main seeding screen as well as the options that are available for configuring your meet.
The RunMeet Screen
This is the main screen for seeding your meet. Two representative running events are shown below, although you will likely see many more events, depending on your meet. Each item is described below.
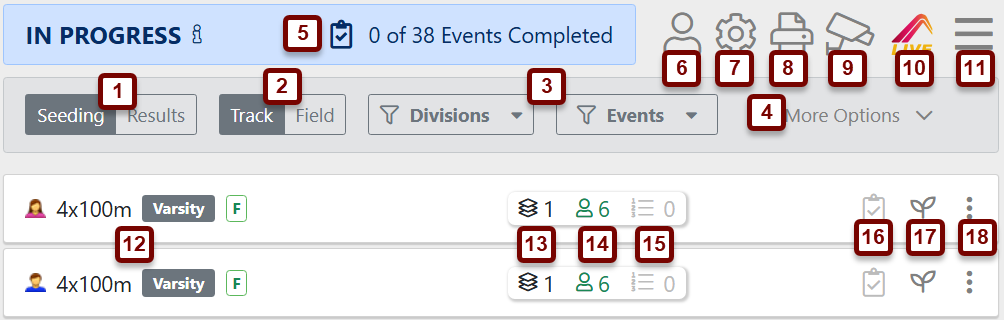
- Seeding/Results: Use this toggle to select between seeding and entering results. Seeding will allow you to change how runners in a heat are organized. Results will allow you to enter results for each runner in each heat.
- Track/Field: Use this toggle to change whether running events or field events are displayed.
- Division & Event Selector: Use these drop-down menus to display specific divisions and/or events.
- More Options: Gives the options to 'Hide Completed Events' and/or 'Hide Canceled Events'.
- Meet In Progress & Official: Once all results have been entered and all events have been marked complete or canceled, the meet will automatically change from "In Progress" to "Official" on AthleticNET.
- Athletes (): Add athletes, assign competitor numbers and mark athletes as unattached. For more information, see Assigning and Using Competitor Numbers.
- Global Settings (): Use this button to access the settings page described in RunMeet: Setup and Settings. Settings not defined in a particular event will default to the settings chosen on this screen.
- Reports (): Click this button to access the reports functions. This screen will allow you to create heat sheets, athlete rosters, meet programs, and scoring sheets. For more information, see RunMeet: Producing Heat Sheets and Other Reports
- FAT Setup (): Provides access to the documentation and companion software to integrate AthleticRUNMEET with FAT systems. See Using RunMeet with Fully Automatic Timing.
- Creating an AthleticLIVE Meet: Use this button to create an AthleticLIVE meet. For more information, see Create an AthleticLIVE Meet.
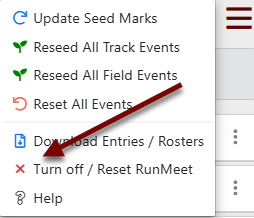
- Global Seeding Actions (): Provides the following options
- Download Results: Allows you to download results in HyTek Semicolon Delimited, TFRRS CSV, or Tab Delimited format.
- Update Seed Marks: Re-imports athlete seed marks from the AthleticNET entries. Useful if athletes have updated seed marks since entries were opened.
- Reseed All Track Events: Reseeds all track events that don't already have results, taking into account any updated seeds retrieved from AthleticNET with the Update Seed Marks tool above.
- Reseed All Field Events: Reseeds all field events that don't already have results, taking into account any updated seeds retrieved from AthleticNET with the Update Seed Marks tool above.
- Reset All Events: Removes all athletes from their assigned heats and lanes.
- Download Entries / Rosters: For more information, see Downloading Meet Entries.
- Turn Off / Reset RunMeet: Completely resets all settings, results, and seeding. Sends you back to the beginning of the setup process.
- Help: Opens the AthleticRUNMEET documentation.
- Event Listing: Shows the gender, event, division, and round for the event. Click to expand and show the heats that have been seeded.
- Heats (): Show the number of heats in the event as it's currently seeded.
- Entries (): Shows the total number of entries in the event. A green number indicates that all entrants are currently assigned a heat and lane. An orange number indicates that some entrants have yet to be assigned a heat and lane. A red number indicates that no entrants have yet been assigned a heat and lane.
- Results (): Shows the total number of results that have been entered for an event.
- Mark Complete (): Once all results for an event have been entered, you can mark the event complete by clicking this button. Once all events have been marked complete, you can mark the meet results official. For more information, see RunMeet: Entering Results.
- Seed/Reseed Event (): Assigns (or reassigns) each entrant in the event to a heat and lane based on the global settings and the individual event settings selected.
- Individual Event Menu ():
- Republish Results: Sends the entered results for the selected event to the public results page on the meet's Athletic.net listing. If you have already published results, an Unpublish Results selection will also be visible.
- Reseed Event: Reassigns each entrant in the event to a heat and lane based on the global settings and the individual event settings selected.
- Meet Program: Prepares a printable report of competitors organized by height/flight for the selected event
- Finish Line Sheets (running events): Prepares a printable list for recording running results for the selected event
- Field Event Sheets (field events): Prepares a printable scorekeeping sheet for the selected event
- Settings: Edit the seeding preferences for the individual event. See Individual Event Settings below.
- Reset: Removes all athletes from their assigned heats and lanes.
- Cancel Event: Removes the selected event from the meet schedule. If your meet doesn't run an event, you must cancel it here before results may be marked official. Once you have begun to enter results for an event, this option is no longer available.
Individual Event Settings
While many events have similar requirements to each other (i.e., all sprint events have eight lanes and should be run fast-to-slow) and can be configured in global settings, other events may need to be configured on an individual basis. For example, you'll need to indicate to the system what the maximum number of runners that is acceptable in a single heat of a distance event, and that number may be different depending on the distance of the event.
Running Events

- Timing Method: Select whether the times you'll enter for results will be generated by a Fully Automatic Timing system, or by hand-timing. If you select hand timing, a conversion factor will be applied to the results when they are posted to Athletic.net. See Hand Time Conversion Standards for more information.
- Pick Break Points: Select whether or not to pick break points when seeding the event.
- Start Type: How are athletes organized on the starting line?
- Lanes: Standard lanes are assigned, with best seeds assigned in center lanes
- Alleys: Two athletes are assigned per lane, one faster athlete and one slower athlete. For example, on an eight lane track, the eight highest-seeded athletes would all be placed into the eight lanes as they would be if there were one runner per lane. Then, the ninth-best seeded runner would be placed in the same lane as the best seeded runner, the tenth seed would be placed in the same lane as the second seed, and so forth. This style of seeding is often used in the 800 meter run.
- Waterfall: Athletes start along a curved “waterfall” start line on the track. The best seeds are given the lowest position numbers, and start closest to the inside of the track.
- Staggered Waterfall: Waterfall start from two staggered alleys. The best seeds can be given the main waterfall or the staggered waterfall preference.
- Lanes: How many lanes are to be used on the track when seeding the event. If you chose “Waterfall” above, this will change to Positions. Change the number of positions to the maximum number of runners you want to have in a single heat. If you chose “Alleys” above, this will change to Alleys and another box will appear named Max Heat Size. Alleys is the number of lanes that you want to have more than one runner in.
- Heat Sizes
- Max Heat Size: The maximum size of each heat. For laned races, the max heat size may be less-than or equal-to the number of lanes. For alley position assignment, max heat size may be greater than the number of alleys (if you'd like to place two or more athletes in each alley). For waterfall starts, this setting is not visible, as the max heat size will be the same as the number of start positions.
- Min Heat Size: For "weighted" heat distribution (see below): the minimum size of each heat. This setting will not be visible if "even" heat distribution is selected.
- Heat Assignment: Select how runners are assigned to their heats.
- Assign By:
- Seed Time: Runners will be organized into heats based on similar seed times.
- Random: Runners will be randomly assigned to heats.
- Last Name: Runners will be assigned in alphabetical order by last name.
- Team Name: Runners will be assigned in alphabetical order by team name.
- Assign By:
- Heat Order: Select in which order you'd like to run heats.
- Fast-to-Slow: Heats with the fastest athletes will be run first.
- Slow-to-Fast: Heats with the slowest athletes will be run first.
- Random: Heats run in a random order.
- Heat Distribution: Select how you want heats filled.
- Weighted: Faster heats are filled to capacity, and remaining entries placed in slower heats.
- Even: Heats are filled evenly so they are as close to the same size as possible.
- Lane / Alley Assignment (or Waterfall Order): The order in which athletes are assigned start positions within each heat.
- Seed Time: Runners will be organized into heats based on similar seed times.
- Random: Runners will be randomly assigned to heats.
- Last Name: Runners will be assigned in alphabetical order by last name.
- Team Name: Runners will be assigned in alphabetical order by team name.
- Alternating Lanes: select from the drop-down if you want to only use even or odd lanes.
- Lane Selection: If you'd prefer that some lanes on your track not be seeded, you can use this setting.
- Team Position Assignment: Select a team position assignment configuration that will be applied when the event is seeded.
Field Events

- Result Measurement: Select the unit of measurement used for entering results.
- Seed Mark Measurement: Select the unit of measurement used for displaying and inputting seed marks.
- Pick Break Points: Select whether or not to pick break points when seeding the event.
- Max Flight Size: Select the maximum number of competitors you'd like to appear in each flight of this event.
- Flight Assignment: Select how competitors are assigned into flights.
- Seed Mark: Competitors will be organized into flights based on similar seed marks.
- Random: Competitors will be randomly assigned to flights.
- Last Name: Competitors will be assigned in alphabetical order by last name.
- Team Name: Competitors will be assigned in alphabetical order by team name.
- Flight Order: Select whether the flight with the worst seed marks or the best seed marks should compete first
- Position Assignment: Select how competitors are assigned within their flight.
- Seed Mark: athletes are ranked by seed mark.
- Random: athletes are ranked randomly.
- Last Name: athletes are ranked in alphabetical order by last name.
- Team Name: athletes are ranked in alphabetical order by team name.
- Team Position Assignment: Select a team position assignment configuration that will be applied when the event is seeded.
Auto-Reseeding

One of the most powerful features of the RunMeet tools is the Auto-Reseeding functionality. Auto-Reseeding is off by default, but the settings to enable it or disable it can be found under the Global Settings (item 6 in the RunMeet Screen above). In a nutshell, Auto-Reseeding automatically reseeds each event as new entries are added, removed, or seed marks are adjusted. The settings you have defined both globally and for individual events are taken into account when the event is reseeded.
For example, let's say you have eight entries in your women's 100m dash, and you've configured a minimum heat size of three. Currently, you've got one full heat. Just before the deadline, an additional entry is added, bringing the total number of entrants to nine. As soon as the new entry is added, RunMeet automatically adds a second heat, moves the appropriate runners from the first heat to the second heat, and adds the new entry in the appropriate heat and lane. In our example, adding the ninth entrant to the event would either cause the event to be split into a heat of six and a heat of three, or a heat of five and a heat of four, depending on your Heat Distribution settings (described above).
Auto-Reseeding is a powerful tool, but it can also cause confusion, since heat and lane assignments may be updated. Use caution when enabling auto reseeding, to ensure that data sent to your meet participants is accurate!
Manually Adjusting Seeding
If you need to make manual adjustments to heats or flights, you can do so quickly by clicking on the event. This will open the event and display each heat or flight.
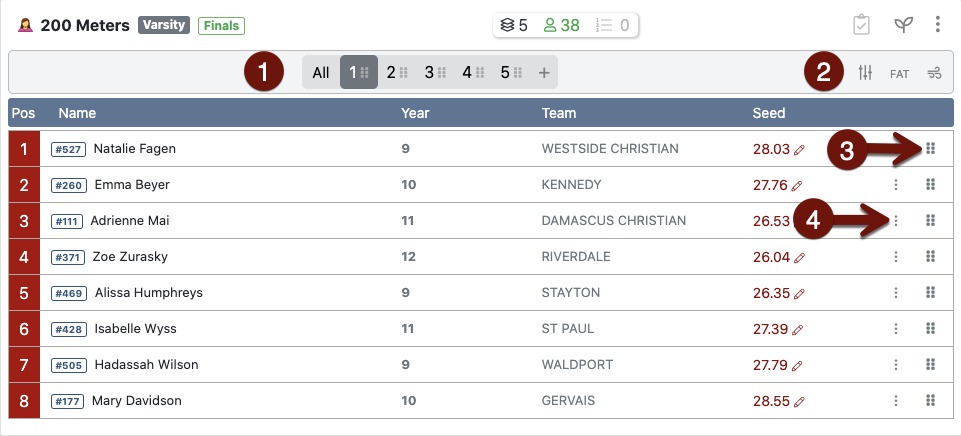
- Heat Selector: Shows the number of heats/flights in the current event. Click on a number to display that particular heat.
- All will show all the heats in order. This will allow you to see the state of all heats at a glance, and swap athletes between heats.
- To change the order of heats, click and drag the heat into its correct location. Heats will be renumbered accordingly.
- To delete a heat, drag-and-drop the heat you want to delete onto the trash icon that appears when you begin dragging the heat.

- To add a heat, use the Add Heat () icon.
- Individual Heat Controls:
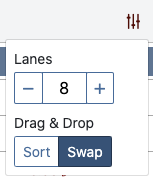
- Adjustments (): Opens a menu allowing you to add lanes or positions to the heat, as well as modifying the drag-and-drop behavior for moving athletes around.
- FAT/: Toggles the heat between Fully Automatic Timing and Hand Timing.
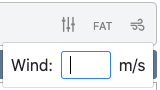
- Add Wind Reading (): Allows you to enter a wind reading for the heat, in meters per second.
- Adjustments (): Opens a menu allowing you to add lanes or positions to the heat, as well as modifying the drag-and-drop behavior for moving athletes around.
- Drag Handle (): Click and drag to relocate the athlete within the current heat. Whether the athlete is inserted or swapped depends on the setting you chose in the adjustments above.
- Athlete Menu:
- Scratch: Removes the athlete from the heat. If you use the Reseed button () after scratching an athlete, the event will be reseeded to properly take the missing athlete into account, adding or deleting heats as necessary.
- Unseed: Places the athlete in the Unseeded section for reassignment to another heat.
- Mark Exhibition: Prevents the athlete from scoring or placing in the event. See Marking an Athlete as Exhibition.
Adding an athlete to an event
You can add an athlete to an event in one of two ways. First, you can use the AthleticRUNMEET Entries Screen, which will allow you to add athletes to events without seeding them. You can then choose to reseed the whole event, or put the athlete in a position manually.
Alternatively, you can do a quick add by clicking the icon next to any open position:
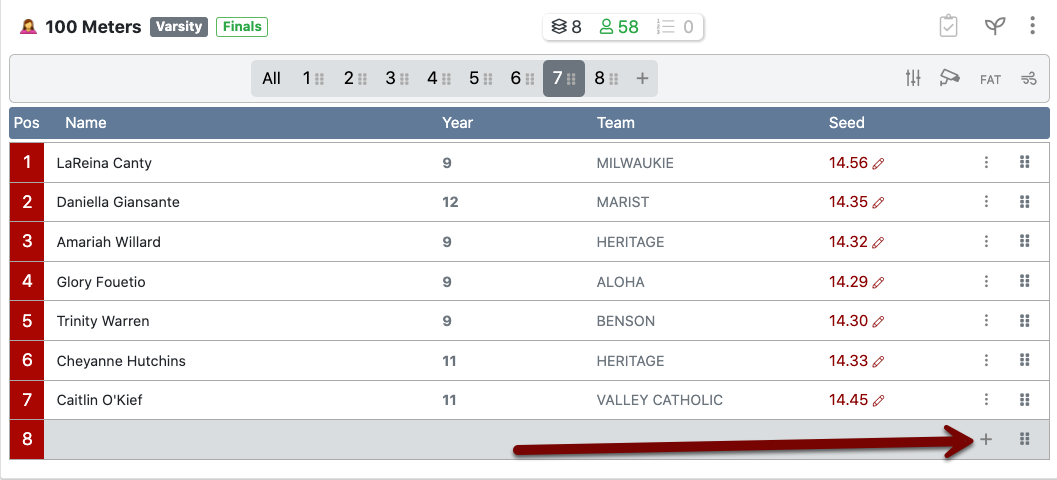
This will pop open a box where you can type an athlete's name or competitor number. Athletes entered in the event but not yet seeded will be automatically suggested.
Once you've gotten all the athletes seeded properly, you'll need to produce heat sheets and other reports. See RunMeet: Producing Heat Sheets and Other Reports for further information.